

Loose lay vinyl flooring is a unique type of vinyl flooring. This vinyl product stays in place using friction and its own weight. You do not need glue, staples, or click-lock systems for the installation. The heavy-duty backing on this vinyl grips your subfloor. This feature makes loose lay vinyl flooring a simple and fast solution.
DIY-Friendly Tip: This loose lay flooring offers a remarkably easy installation. Its design makes it perfect if you want flexibility and hassle-free repairs for your vinyl. The simple installation process makes loose lay vinyl flooring a top choice.
What Are the Pros and Cons of Loose Lay Flooring?
You should weigh the advantages and disadvantages before choosing any new flooring. Loose lay vinyl flooring offers many unique benefits. Its design solves common problems for homeowners. Let’s explore the pros that make this flooring a popular choice.
Pro: Simple, No-Glue Installation
One of the biggest benefits of loose lay vinyl flooring is its simple installation. Unlike other types of vinyl, you do not need messy adhesives or special tools. The planks stay in place using friction and their own weight. This makes the installation process incredibly fast. You can often complete a room in just a few hours.
This easy installation is perfect for DIY projects. While click-lock systems are also straightforward, loose lay flooring is even simpler. You just place the planks tightly against each other on the subfloor. This method saves you time and money on labor costs. Easy maintenance is another one of the benefits. If a plank gets damaged, you can just lift it out and replace it without disturbing the rest of the floor.
Pro: Durable and 100% Waterproof
Loose lay vinyl flooring delivers excellent durability and waterproof performance. The material itself is 100% waterproof. This means water will not damage the planks or tiles. This makes the vinyl a fantastic option for kitchens, bathrooms, and basements. The waterproof surface provides peace of mind against spills and moisture.
The durability of vinyl flooring depends heavily on its wear layer. This top layer protects the floor from scratches, scuffs, and stains. A thicker wear layer provides better protection and long-lasting quality. For most homes, a 12 mil wear layer is sufficient. However, for high-traffic areas or homes with pets and kids, a 20 mil wear layer offers superior durability. This thickness is also suitable for many commercial spaces.
Understanding Wear Layers The wear layer is the key to your floor’s lifespan. Choosing the right thickness ensures your vinyl floor can handle daily life in high-traffic areas.
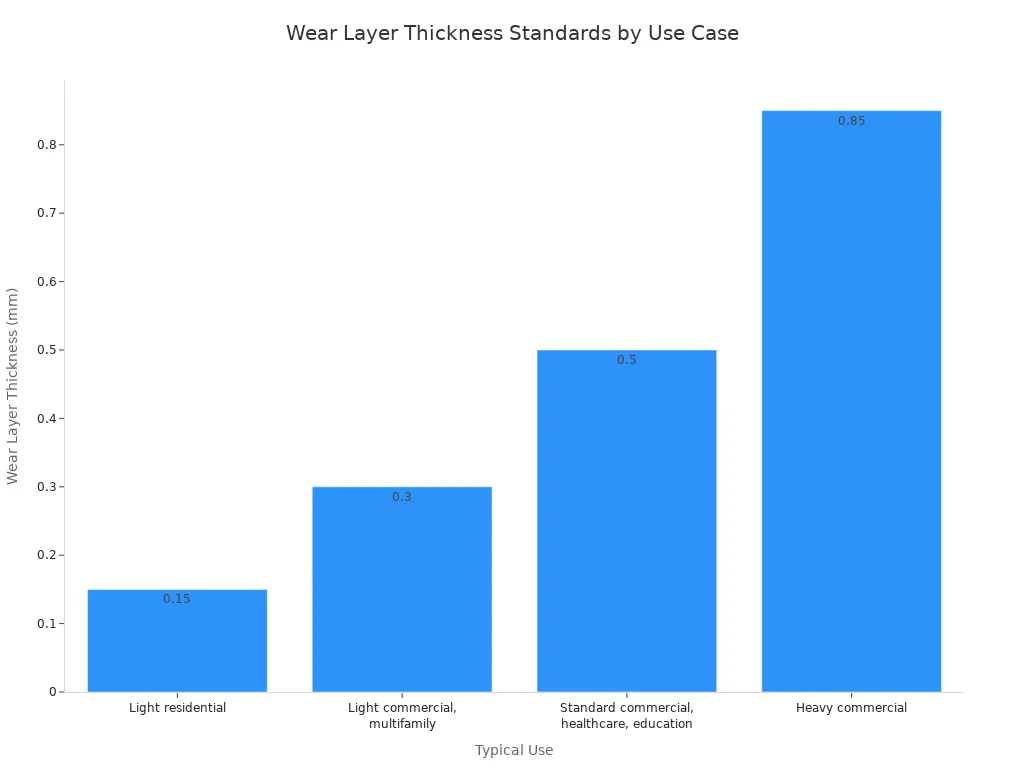
Here is a quick guide to wear layer thickness and its typical use:
| Wear Layer Thickness | Typical Use |
|---|---|
| 12 mil (0.3 mm) | Residential, Light Commercial |
| 20 mil (0.5 mm) | Heavy Residential, Standard Commercial |
| 28–40 mil (0.7–1.0 mm) | Heavy Commercial, High-Traffic Areas |
The combination of durability and waterproof features makes this vinyl a practical choice. Its strong construction ensures it looks great for years with minimal maintenance.
Pro: Comfortable and Quiet Underfoot
Comfort is another of the key benefits of loose lay flooring. The planks are typically thicker than standard glue-down vinyl, often around 5mm. This extra thickness provides more cushioning underfoot. It feels softer and warmer to walk on compared to thin vinyl or ceramic tile.
This thickness also helps with sound insulation. The material absorbs sound, reducing noise within a room. This makes your home quieter and more peaceful. Some loose lay vinyl products have excellent Sound Transmission Class (STC) ratings. An STC rating measures how well a structure blocks airborne sound. Many building codes require a rating of 50. Certain 5mm loose lay vinyl products can achieve an STC rating as high as 62, which is great for reducing noise between floors. Its water-resistant properties and easy maintenance make it a complete package.
Con: Subfloor Must Be Perfectly Flat
A perfectly flat subfloor is non-negotiable for loose lay vinyl flooring. The planks rely on gravity and friction to stay in place. They do not have a locking mechanism to hold them together. Any bumps or dips in your subfloor will cause problems. You might see gaps between planks or feel movement underfoot. This vinyl will telegraph, or show, any imperfections below it.
You must check your subfloor before installation. The industry has strict standards for flatness. Your subfloor must meet these requirements for a successful project.
- The surface must be flat within 3/16 of an inch over a 10-foot span.
- There should be no sudden height differences.
- Any slope should not exceed 1 inch over 6 feet.
Subfloor Prep is Key! 🚧 Taking the time to level your subfloor is the most important step. A flat surface ensures your new loose lay vinyl flooring performs correctly and looks beautiful for years. Skipping this step can ruin the entire installation.
Preparing an uneven subfloor adds time and cost to your project. You may need to sand down high spots or use a self-leveling compound to fill in low areas. This extra work is essential for this type of vinyl.
Con: Not Ideal for Very Large Rooms
Loose lay flooring works best in small to medium-sized rooms. You should be cautious when considering it for large, open-concept spaces. This is because vinyl expands and contracts with temperature changes. In a smaller room, this movement is minimal and manageable.
In a very large room (typically over 400 square feet), the collective expansion of all the planks can be significant. Since the planks are not secured to the subfloor, this movement can cause the floor to buckle in the middle or pull away from the walls. This creates an unstable and unsightly surface. For these larger areas, installers often recommend using adhesive around the perimeter of the room. This helps anchor the entire floor system and control movement. This method, however, removes some of the benefits of a true loose lay vinyl flooring installation. If you have a very large space, a glue-down or click-lock vinyl product might be a more reliable choice.
Key Factors for Choosing Loose Lay Vinyl Flooring
Making the right choice involves more than just picking a color. When you are choosing loose lay vinyl flooring, you must consider your room’s specific needs. These key factors will help you decide if this innovative vinyl is the perfect match for your project.
Room and Location Suitability
You can install loose lay vinyl flooring in almost any room of your house. It excels in moisture-prone areas like bathrooms, kitchens, and basements. However, you should think about two important factors: heavy loads and sunlight. This type of vinyl is softer than other materials. Heavy rolling items or very heavy furniture can leave indentations over time.
☀️ Sunlight and Fading Prolonged, direct sunlight can cause the color of your vinyl flooring to fade. You should use curtains or blinds in rooms that get intense sun exposure to protect your new floor.
Subfloor Condition
Your subfloor’s condition is the most critical factor for a successful installation. This vinyl requires a smooth, flat, and clean surface. Loose lay vinyl flooring can be installed over several types of subfloors if they are properly prepared.
- Concrete: You can lay the vinyl directly on concrete. The surface must be level and free of cracks. You will need a moisture barrier to block dampness.
- Wood or Plywood: This vinyl works well over wood subfloors. You must sand down any imperfections and secure any loose boards first.
- Existing Floors: You can install this vinyl over existing tile or sheet vinyl. You must ensure the old floor is secure and level. You may need to fill grout lines to create a flat surface.
Cost vs. Other Flooring Types
Loose lay vinyl flooring offers a unique value proposition. The material cost per square foot is often similar to or slightly higher than high-quality click-lock vinyl. However, you save significant money on installation.
- DIY Savings: You do not need to buy adhesives or expensive tools. The simple installation process eliminates the need to hire a professional, saving you hundreds in labor costs.
- Long-Term Value: The durability and easy repair process add to its long-term value. Replacing a damaged plank is simple and cheap. This makes loose lay vinyl flooring a very cost-effective option over its lifespan.
Style and Design Options
Your flooring is a major part of your home’s look. Luckily, loose lay vinyl flooring offers a huge range of styles. You are not limited to basic looks. Modern manufacturing creates beautiful and realistic vinyl planks and tiles. You can find the perfect match for any room’s decor. The available design choices make this vinyl a top contender for style-conscious homeowners.
Wood and stone looks are the most popular options. Luxury vinyl flooring uses advanced texturing to copy the natural details of real materials. This includes subtle knots, clear grain patterns, and delicate veining. These features give the vinyl an authentic look and feel. Stone effect vinyl tiles come in many realistic textures and colors. They are inspired by natural stones and offer elegance and durability.
You can also choose from several surface textures to get the exact look you want. Each texture adds a unique character to your floor.
- Hand-scraped: This texture mimics hand-finished wood. It has subtle grooves that provide a rustic charm.
- Embossed: This option gives the vinyl a high-end look. It features fine wood grain details for a sophisticated feel.
- Wire-Brushed: This texture has soft lines for a gently weathered effect. It is a great choice for modern spaces.
- Textured Stone: This finish captures the beauty of surfaces like slate or travertine. You get a luxury look without the difficult maintenance of real stone.
These options ensure your loose lay vinyl flooring will not only perform well but also elevate your home’s style.
How to Install Loose Lay Vinyl Flooring
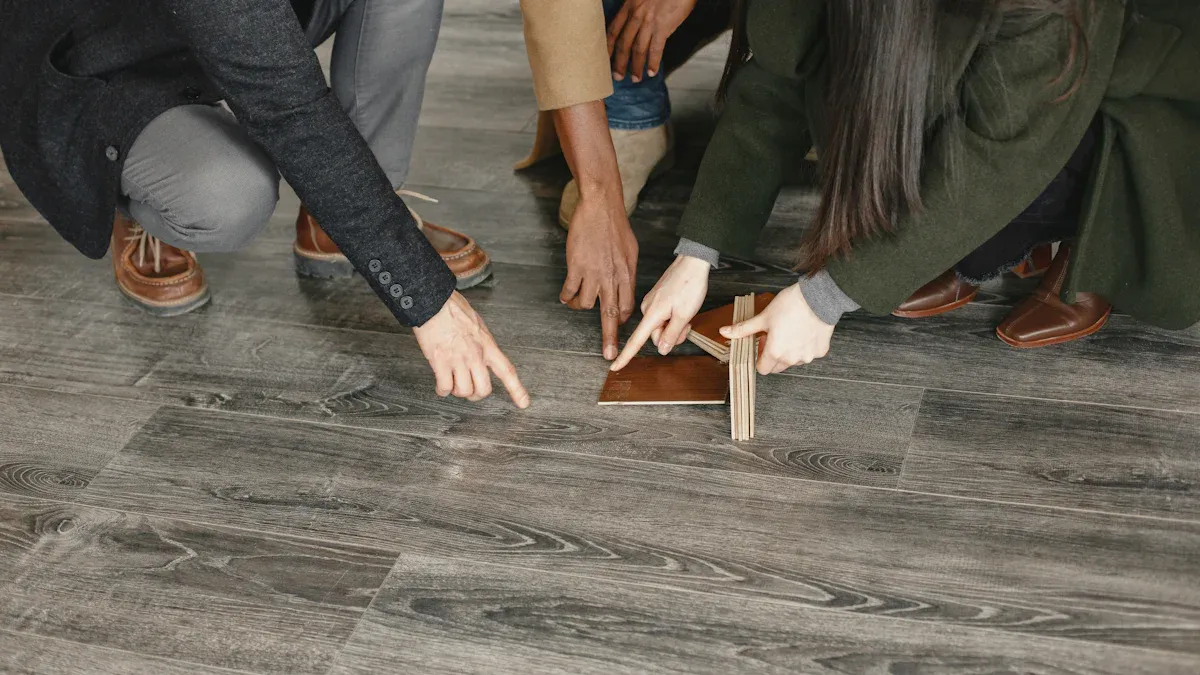
The easy installation is a major selling point for loose lay vinyl flooring. You can achieve a professional-looking result with just a few basic tools and careful preparation. Following these steps will guide you through a successful installation.
Step 1: Acclimate the Planks
You must let your new vinyl planks get used to their new environment. This step is called acclimation. It allows the vinyl to adjust to your home’s temperature and humidity. Skipping this crucial step can ruin your entire project.
Why Acclimation Matters 🌡️ If you fail to acclimate the vinyl, the planks may expand or contract after installation. This can cause serious problems and void your flooring warranty. Potential issues include:
- Warping or bowing
- Gaps appearing between planks
- Buckling or peaking in the middle of the floor
- Damage to the interlocking mechanisms on some vinyl types
For a successful installation, you need to create the right conditions.
- Let the loose lay vinyl flooring planks acclimate in the room for at least 48 hours.
- Keep the room temperature between 65-85°F before and during the installation.
- Maintain a relative humidity (RH) between 30-60% in the space.
Step 2: Prepare the Subfloor
A perfect subfloor is the foundation of your new floor. This vinyl requires a completely flat, clean, and dry surface. Take your time with this step. Proper preparation ensures your new floor will look great and perform well for years.
Here is how you can prepare your subfloor for installation:
- Remove Old Flooring: You need to pull up any existing carpet, tile, or old vinyl. Remove all staples, nails, and leftover adhesive.
- Clean the Surface: Sweep or vacuum the subfloor thoroughly. You must remove all dirt, dust, and debris. A clean surface is essential.
- Inspect for Damage: Look closely for any cracks, holes, or uneven spots.
- Check for Moisture: You must check the moisture level of your subfloor. For concrete, the moisture content (MC) should be below 4.5%. According to ASTM standards, a relative humidity (RH) of 75% or less is acceptable. However, always check the vinyl manufacturer’s specific guidelines. You may need to install a vapor barrier or damp proof membrane (DPM) to block moisture.
- Make Repairs: Use a repair mortar or crack filler to fix any damage you found.
- Level the Surface: Apply a self-leveling compound to fix any dips or low spots. The subfloor must be flat within 3/16 of an inch over a 10-foot span. Let the compound dry completely, which usually takes about 24 hours.
Step 3: Lay Your First Row
With a prepared subfloor, you are ready for the fun part. Laying the planks is simple and satisfying. You will start along the longest, most visible wall in the room.
First, you need to establish a straight starting line. Place your first plank in a corner against the wall. You should leave a small expansion gap of about a quarter-inch between the plank and the wall. This space allows the vinyl to expand and contract with temperature changes, preventing buckling. Use spacers to maintain this gap consistently.
Pro Tip: For a more balanced look, measure the width of your room. Divide this number by the width of a single plank. If the last row will be less than half a plank wide, you should cut your first row of planks narrower. This will make the first and last rows a similar width.
Lay the next plank in the row, butting its short end tightly against the first plank. Continue this process until you reach the end of the wall. You will likely need to cut the last plank to fit. This completes your first row and sets the stage for the rest of your installation.
Step 4: Cut and Fit Around Edges
You will need to make cuts to fit the vinyl planks perfectly at the end of rows and around obstacles. This step ensures your new floor has a clean, professional finish. The final part of your installation involves careful measuring and cutting.
First, you will cut the last plank for each row. Measure the distance from the last full plank to the wall. Remember to account for the small gap you left. Mark this measurement on a new vinyl plank. Use a sharp utility knife and a straight edge to score the plank along your mark. You can then snap the vinyl plank cleanly along the scored line. This simple method works well for straight cuts.
Your room will likely have tricky spots like door frames, corners, or pipes. You need the right tools for these complex cuts to make the installation look seamless.
Pro Tools for Perfect Cuts 🧰 Using the correct tool makes your installation much easier and gives you a better result.
- Jigsaw: This tool is perfect for cutting circles or complex corners. A fine-toothed wood blade works well for most vinyl planks.
- Multitool: Use this tool to undercut your door frames and trim. This allows you to slide the vinyl plank underneath the frame. This technique creates a much cleaner finish than cutting the plank around the frame.
- Blade Choice: Always choose a blade designed for the core of your vinyl. A plastic-specific blade is best for a plastic core, while a wood blade works for a wood-based core.
When fitting planks, you might wonder about leaving a gap. Unlike other floors, loose lay vinyl has a unique installation requirement.
A Note on Expansion Gaps Loose lay vinyl planks typically do not require an expansion gap around the room’s perimeter. The product’s heavy weight and special backing allow for small movements without buckling. However, you must acclimate the flooring before installation. Always check the manufacturer’s specific guidelines for your vinyl product.
As you lay subsequent rows, remember to stagger the seams. The end joints of the planks should not line up with the joints in the previous row. A good rule is to start a new row with the piece you cut off from the end of the last row, as long as it is at least 6-8 inches long. This staggered pattern makes the floor stronger and looks more natural. This is a key part of a successful vinyl flooring installation. The entire installation process is designed for simplicity.
Is This Flooring Right for Your Home?

You now understand the pros, cons, and installation of loose lay vinyl flooring. The final step is deciding if this vinyl is the right choice for your specific needs. This flooring offers unique benefits for certain homeowners and situations.
Ideal for DIYers and Renters
If you are a DIY enthusiast or a renter, loose lay vinyl flooring is an excellent option. Homeowners love the simple installation that saves money on labor. For renters, the benefits are even more significant because the vinyl is not a permanent change to the property.
- Easy Installation and Removal: You can install this vinyl without permanent glue, which is perfect for rental agreements.
- Simple Maintenance: The vinyl is naturally waterproof and scratch-resistant. This makes cleaning and maintenance easy, reducing the risk of damage.
- Easy Repairs: You can replace a single damaged plank without disturbing the whole floor. This simple maintenance is a huge plus.
- Sound Reduction: The thick vinyl planks help reduce noise, which is a great feature in apartments or multi-story residential spaces.
Perfect for Basements and Bathrooms
Loose lay flooring is a top performer in moisture-prone areas. Its 100% waterproof construction makes it ideal for basements, bathrooms, and laundry rooms. Spills and humidity will not damage the vinyl planks. This waterproof quality provides peace of mind. The durable wear layer also stands up well to the demands of these high-traffic areas. You get a floor that is both practical and stylish, with easy maintenance for busy households. These benefits make it a smart choice for challenging environments.
When to Consider Other Options
This flooring is not a universal solution. You should consider other options if your subfloor is not perfectly flat. Preparing an uneven surface can add significant cost and effort. This vinyl is also not ideal for very large, open-concept rooms where expansion and contraction could cause issues. Finally, while DIY installation is a major draw, homeowners should be cautious about warranties.
Many manufacturers require professional installation for the warranty to be valid. If you do not install the product according to their instructions, you could void your warranty.
For high-traffic areas with heavy rolling loads or in homes with intense, direct sunlight, a glue-down vinyl might offer better long-term stability.
Loose lay vinyl flooring offers an excellent balance of durability and easy installation. This waterproof vinyl is a top choice for homeowners who want a fast installation. The vinyl’s water-resistant properties and durability make it perfect for moisture-prone areas.
You can confidently choose this loose lay flooring for your home. By evaluating your subfloor and project goals, you can decide if this innovative, waterproof vinyl is the right fit. Many homeowners find loose lay vinyl flooring to be a simple, waterproof solution for a quick installation.
FAQ
Can I use an underlayment with loose lay vinyl?
You generally do not need an underlayment. Loose lay planks have a thick, built-in backing that provides cushioning and sound insulation. Adding an extra layer can make the floor feel unstable. Always check the manufacturer’s specific guidelines before you install the flooring.
How do I clean loose lay vinyl flooring?
Cleaning this vinyl is very simple. You can sweep or vacuum regularly to remove dirt. For deeper cleaning, use a damp mop with a pH-neutral floor cleaner. You should avoid using harsh chemicals, wax, or steam mops, as they can damage the wear layer.
Is loose lay flooring slippery when wet?
No, this flooring is not typically slippery. Most loose lay vinyl planks feature a textured surface that provides good traction, even when the floor is wet. This makes it a safe option for kitchens and bathrooms where spills are common.
Safety First! 👣 While the floor offers good grip, you should always wipe up spills promptly to prevent any potential slips.
Can you install loose lay vinyl over radiant heat?
Many loose lay vinyl products are compatible with radiant heating systems. However, you must follow the manufacturer’s instructions carefully. The temperature should not exceed a specific limit, usually around 85°F (29°C). Exceeding this can damage the vinyl and void your warranty.




