
An excellent choice for a fast and affordable home upgrade in 2026 involves selecting from top easy to install flooring options. You can transform your space with materials like Luxury Vinyl Plank (LVP), Laminate, and Peel-and-Stick Tiles. These products are specifically designed for do-it-yourself success. They feature user-friendly click-lock systems and pre-applied adhesives, requiring minimal tools. This trend is part of a growing DIY home improvement market, which experts project will expand at a rate of 4.5% annually starting in 2026. You get the perfect blend of durability, style, and simplicity, making a new floor an achievable weekend project.
A Closer Look at the Top Easy to Install Flooring Options

You have several excellent choices for your DIY flooring project. Each option offers a unique combination of benefits, costs, and installation methods. Let’s explore the top contenders to help you find the perfect fit for your home and skill level.
Luxury Vinyl Plank (LVP): The All-Around Champion
Luxury Vinyl Plank (LVP) earns its title as the all-around champion. It masterfully combines durability, style, and a straightforward installation process. Most LVP products use a click-lock system. The planks simply snap together, creating a strong, floating floor without needing glue or nails. This makes it a fantastic easy to install flooring option for almost any room in your house.
LVP is also 100% waterproof, so you can confidently install it in kitchens, bathrooms, and basements. Its durability comes from a protective wear layer. A thicker wear layer provides better resistance to scratches and scuffs. Top brands offer impressive warranties, showing their confidence in the product’s lifespan.
| Brand | Wear Layer (mil) | Residential Warranty |
|---|---|---|
| COREtec | 20 | Lifetime |
| Provenza | 20 | Lifetime |
| Mohawk | 20 | 25 years |
| Mannington | 20 | >20 years |
In terms of cost, LVP provides significant value. It gives you the high-end look of hardwood without the high price tag.
| Flooring Type | Average Cost per Square Foot |
|---|---|
| Sheet Vinyl | $1 – $3 |
| Luxury Vinyl Plank (LVP) | $3 – $7 |
| Vinyl Tile | $2 – $8 |
Laminate Flooring: The Budget-Friendly Wood Look
Laminate flooring is your go-to choice for achieving the beautiful look of wood on a tighter budget. Modern laminate offers incredibly realistic textures and patterns that mimic natural wood grains. Like LVP, most laminate uses a simple click-lock installation system, making it another great DIY project.
When you shop for laminate, you should understand its Abrasion Class (AC) rating. This rating tells you how durable the floor is. A higher number means it can handle more foot traffic.
- AC1: Good for low-traffic areas like bedrooms.
- AC2: Suitable for moderate-traffic spaces like living rooms.
- AC3: Ideal for any high-traffic residential area, including hallways and kitchens.
- AC4: Built for busy homes and light commercial use.
- AC5: Designed for heavy commercial spaces.
Brands like Gaia Flooring offer products with various AC ratings, so you can match the durability to your specific needs.
Important Note: You must be careful with laminate in high-moisture areas. While some products are marketed as “water-resistant,” laminate’s core is typically made of wood composite. Prolonged exposure to water can cause serious damage.
Moisture can lead to several problems:
- Warping or Curling: Planks may twist or lift at the edges.
- Bubbling: The top layer can separate from the core.
- Gaps: Planks can shrink and pull apart.
For these reasons, experts advise you against installing standard laminate in full bathrooms or laundry rooms.
Peel-and-Stick Tiles: The Ultimate in Simplicity
For the absolute easiest installation, look no further than peel-and-stick tiles. This type of easy to install flooring is perfect for beginners or for small projects like bathrooms, laundry rooms, and kitchen backsplashes. The process is simple. You just remove the paper backing and press the tile firmly onto a clean, smooth subfloor. There are no special tools or messy glues required.
Modern peel-and-stick tiles are more durable than you might think. High-quality vinyl tiles can even withstand the heavy foot traffic of commercial settings like restaurants. For home use, their lifespan depends on the traffic in the area.
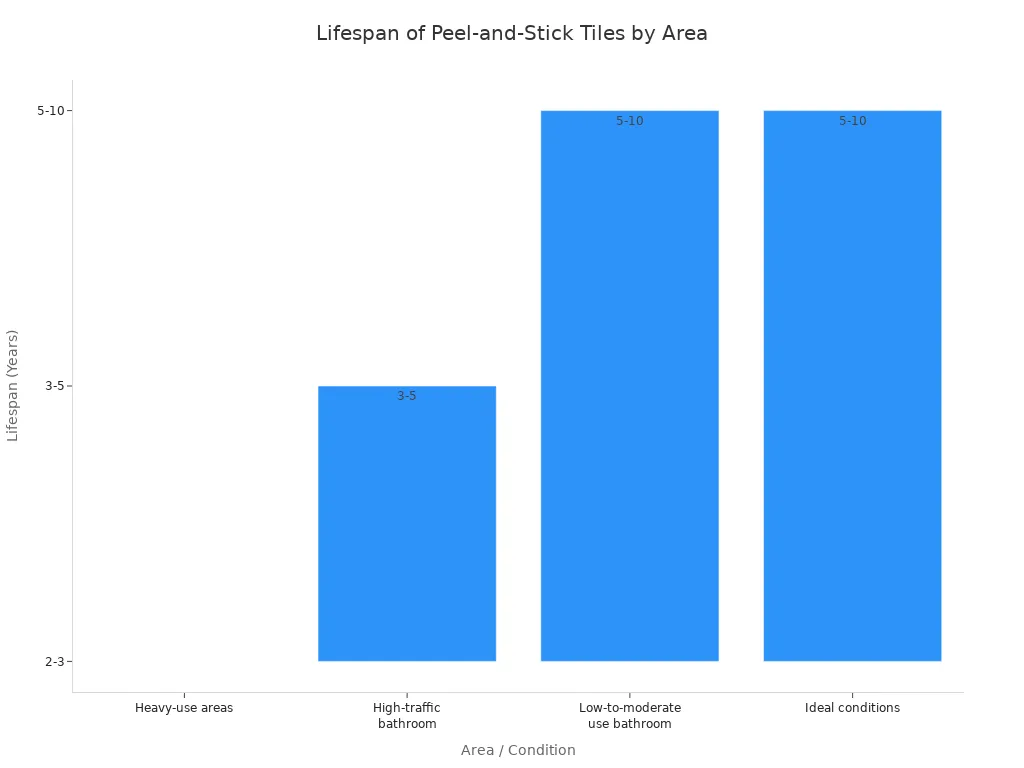
To ensure your tiles stay put, choose a quality brand. For 2025, Stickwoll stands out for its excellent adhesion and realistic designs. Its products perform well even in humid rooms, giving you a reliable and stylish finish.
Click-Lock Engineered Hardwood: The Premium DIY Choice
You might want the timeless beauty of real wood without the difficult installation of traditional hardwood. Click-lock engineered hardwood is your premium choice. This flooring has a top layer of real hardwood veneer. Below this layer is a stable core made of plywood or high-density fiberboard. This construction makes the planks less likely to warp with changes in humidity. The click-lock system allows you to fit the planks together without nails or glue, similar to LVP and laminate.
While it is a more advanced project, this material can be a rewarding type of easy to install flooring for a confident DIYer. It offers an authentic wood experience that adds significant value to your home.
Pro Tip: Engineered hardwood is a bigger investment. Always read the manufacturer’s installation guide carefully. Specific products may have unique requirements for underlayment or expansion gaps.
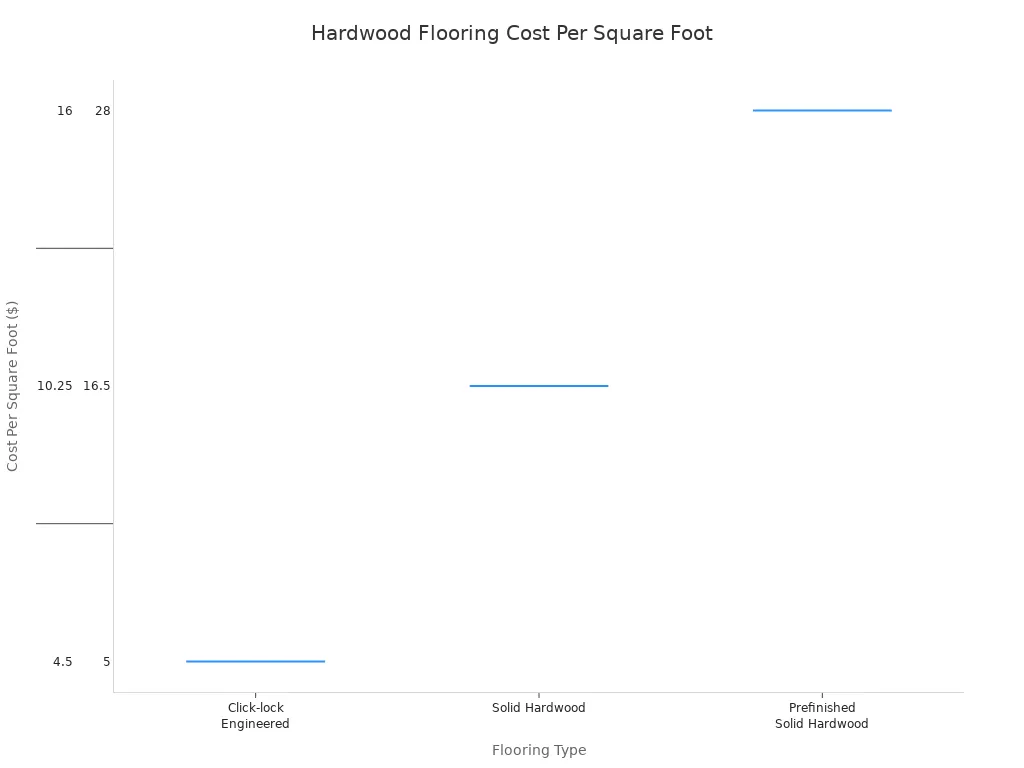
The cost of engineered hardwood sits between more budget-friendly options and expensive solid hardwood. You get the look of solid wood at a more accessible price point. The table below shows how the costs compare.
| Flooring Type | Cost Per Square Foot |
|---|---|
| Click-lock Engineered | $4.50 – $16 |
| Solid Hardwood | $5 – $28 |
| Prefinished Solid Hardwood | $6 – $12 |
The chart below gives you a visual breakdown of these price ranges, helping you see where engineered hardwood fits into your budget.
The installation process is more demanding than LVP. You will need more specialized tools, such as a tapping block and pull bar designed for wood flooring. The material itself is also less forgiving than vinyl. You must handle the planks carefully to avoid damaging the real wood veneer.
This table compares the installation difficulty between LVP and engineered hardwood.
| Feature | LVP (Luxury Vinyl Plank) | Engineered Hardwood |
|---|---|---|
| DIY-Friendliness | DIY-friendly; many people install it themselves. | Not DIY-friendly; requires specific tools, skills, and knowledge. |
| Tools Required | Minimal tools needed. | Specific tools and supplies required. |
| Skill Level | Can be learned via online tutorials/instructions. | Requires specific skills and knowledge for correct installation. |
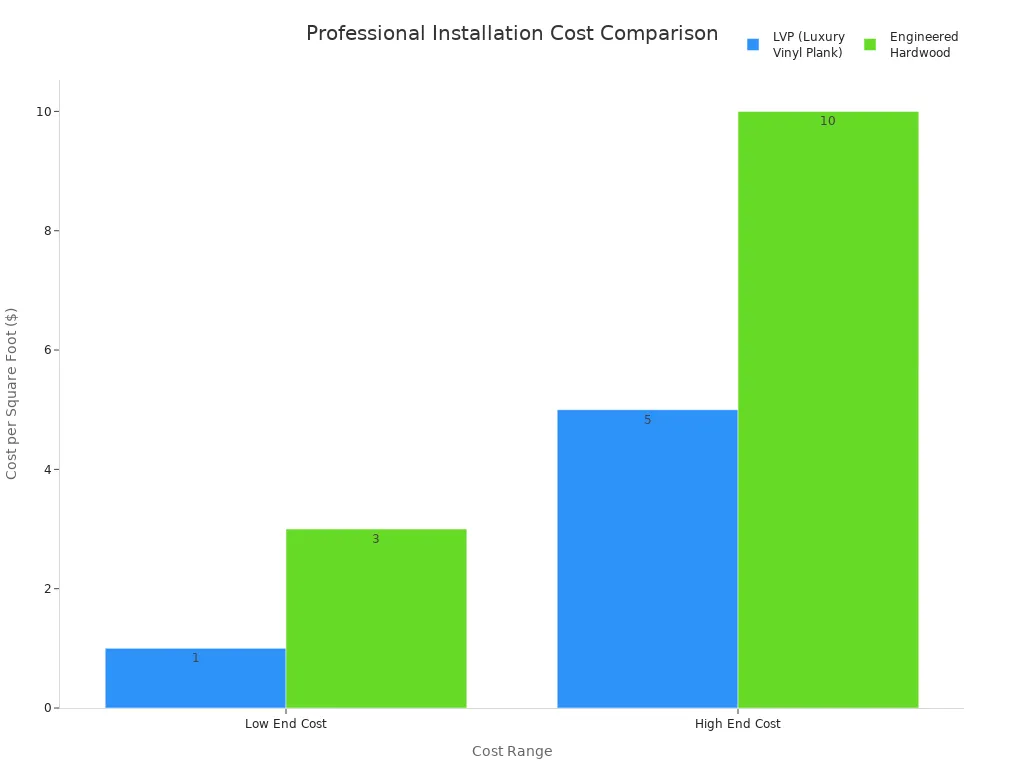
| Professional Cost | Approximately $1-$5 per sq. ft. | Approximately $3-$10 per sq. ft. (can be higher). |
| Overall Difficulty | Easier to install. | More difficult to install. |
If you decide to hire a professional, you can expect to pay more for an engineered hardwood installation. The higher cost reflects the greater skill and time required for a perfect finish.
Choose click-lock engineered hardwood when you want the authentic look and feel of wood and are ready for a more challenging but achievable DIY project.
Before You Begin: Planning for Success
Proper planning is the most important step for a successful DIY flooring project. You need to choose the right material, measure your space correctly, and gather all your tools. Taking the time to prepare will save you from headaches later on.
Choosing the Right Floor for Your Room
You should select a floor that fits the room’s purpose. Consider factors like foot traffic and moisture levels. For busy homes with kids or pets, you want a durable material. Vinyl and laminate flooring are excellent choices because they resist scratches and are easy to clean. For rooms with high moisture, like basements or bathrooms, you need a waterproof option.
This table compares top choices for different environments.
| Flooring Type | Moisture Resistance | Best Use |
|---|---|---|
| Luxury Vinyl Plank | Excellent | Living spaces, wet areas |
| Waterproof Laminate | Good | Dry areas, kitchens |
| Ceramic/Porcelain Tile | Excellent | Wet areas, high traffic |
Luxury Vinyl Plank (LVP) is a great all-around choice. It is 100% waterproof, making it perfect for basements where moisture can be a problem.
How to Accurately Measure Your Space
You must measure your room accurately to buy the right amount of flooring. For a simple rectangular room, you can multiply its length by its width to find the square footage.
After you find the total area, you need to add a “waste factor.” This accounts for cuts and mistakes.
Total Flooring Needed = (Room Area) + (Room Area * 0.10)
A good rule is to add 10% for standard installations. For example, a 210-square-foot room needs an extra 21 square feet. You would purchase 231 square feet in total.
Essential Tools and Materials for the Job
Having the right tools makes any easy to install flooring project go smoothly. Before you start, gather everything you need. You will also need safety gear to protect yourself.
Installation Tools 🧰
- Tape Measure and Pencil
- Jigsaw or Miter Saw
- Rubber Mallet
- Tapping Block
- Pull Bar
Safety Equipment 👷
- Safety Goggles
- Knee Pads
- Gloves
- Dust Mask
Why You Must Acclimate Your New Flooring
You might feel tempted to skip a step called acclimation. However, this is one of the most critical parts of your project. Acclimation means you let your new flooring adjust to the temperature and humidity of the room where you will install it. Flooring materials like wood and vinyl expand or shrink based on their environment. If you install them right out of the box, they will move and shift after they are already on your floor.
Skipping this step can lead to a disastrous outcome and costly repairs. You risk creating serious problems that ruin your hard work. These issues include:
- Warping and Buckling: Planks can bend or lift, creating an uneven surface.
- Gaps: Planks may shrink, leaving ugly gaps between them that trap dirt.
- Adhesive Failure: Peel-and-stick tiles or glued-down floors may not bond correctly, causing them to lift over time.
- Cracking: Rapid temperature changes can cause some materials to crack.
- Reduced Longevity: Your new floor will not last as long as it should.
Pro Tip 💡: To acclimate your flooring, you should open the boxes in the installation room. Spread the planks out in small stacks to allow air to circulate around them.
The time your flooring needs to acclimate depends on the material. You should always check the manufacturer’s instructions, but here are some general guidelines.
| Flooring Type | Recommended Acclimation Period |
|---|---|
| LVP (Luxury Vinyl Plank) | 24-48 hours |
| Laminate | 24-48 hours |
| Engineered Hardwood | 48-72 hours (2-3 days) |
This simple waiting period is your best insurance for a successful installation. It ensures your floor remains stable, beautiful, and functional for years to come.
The Step-by-Step Guide to a Perfect Installation
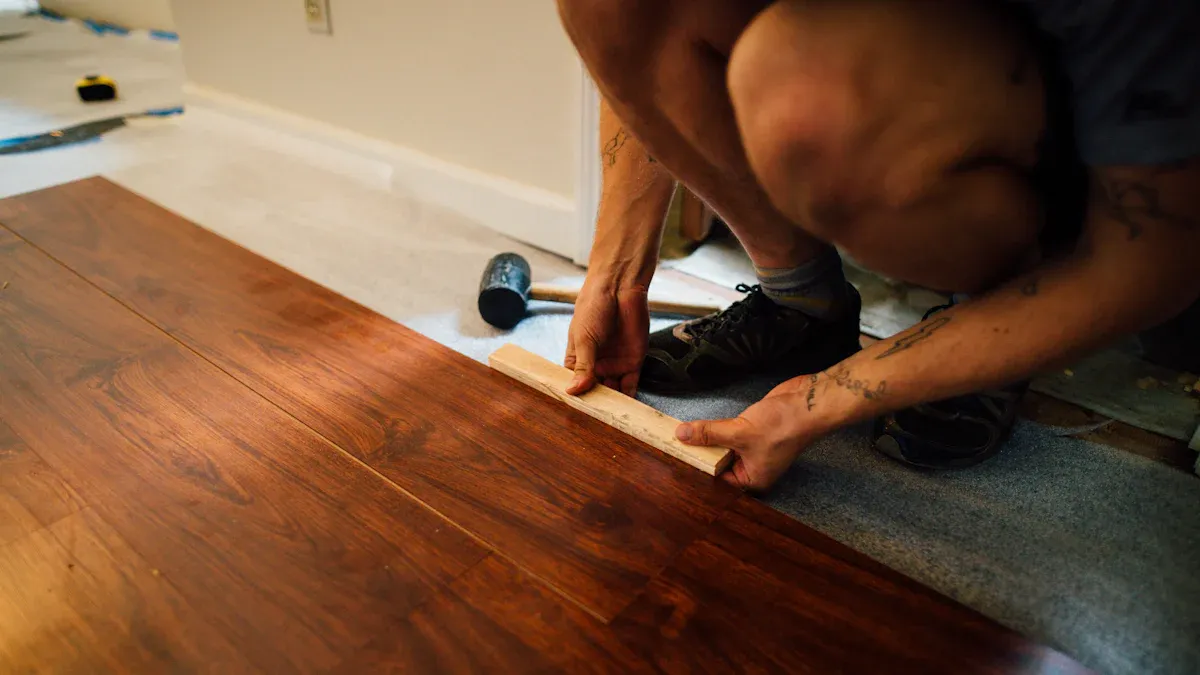
With your materials acclimated, you are ready to begin the installation. Following these steps will guide you toward a professional-looking finish. A careful approach now ensures your floor looks great for years.
Step 1: Preparing Your Subfloor
A clean, flat, and dry subfloor is the foundation of a great flooring job. You must fix any issues before you lay the first plank. You can check for levelness using a 10-foot straightedge to find high and low spots.
If you have a concrete subfloor, you need to take a few extra steps:
- Ensure the concrete is completely dry. A new slab should cure for at least 30 days.
- Make sure the surface is flat and clean. You should grind down any high spots and fill low spots with a leveling compound.
- Install a vapor barrier, like 6 mil polyethylene sheathing, to block moisture from coming up through the concrete.
A smooth subfloor prevents your new flooring from creaking, bending, or separating over time.
Step 2: Planning Your Layout and First Row
You should plan your layout to create a balanced look and minimize waste. A good plan helps you avoid ending up with very thin, awkward-looking planks against a wall. For LVP, you want to stagger the end joints of your planks by at least 6-8 inches. This creates a more natural, random appearance.
Pro Tip: Snap a control line to guide your first row. Start your layout from the most visible wall in the room. This ensures any uneven cuts are less noticeable.
You will always have some waste from cutting planks. The amount depends on the material and the room’s shape. Complex rooms with many angles will produce more waste.
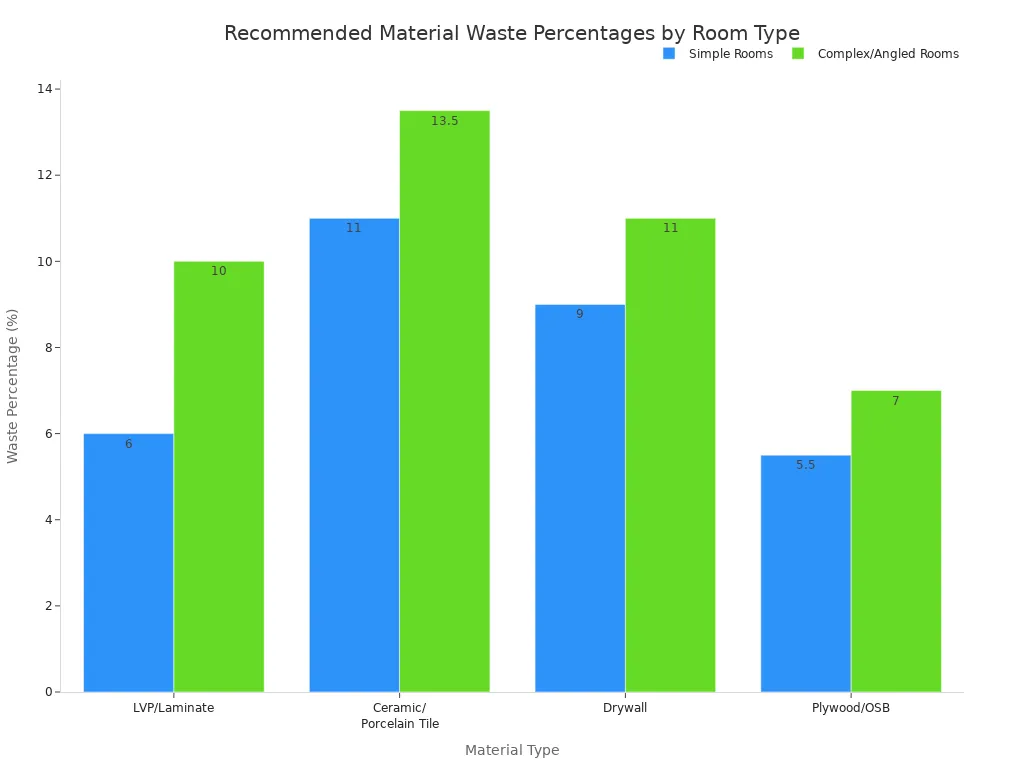
Step 3: Cutting and Fitting Your Flooring
You will need to cut planks to fit at the end of rows and around obstacles. A jigsaw or miter saw works well for making straight cuts on LVP and laminate. Always remember the old rule: “measure twice, cut once.” 📏
For tricky areas like door frames or vents, you can create a template using paper. Trace the shape onto the plank and carefully cut along the line with your jigsaw. This gives you a snug, custom fit.
Step 4: Installing Baseboards and Transitions
You are now on the final step of your installation. Installing baseboards and transition strips provides the finishing touches. These pieces cover the expansion gaps you left and create a seamless look between rooms. This last stage makes your project look truly professional.
First, you will reinstall your baseboards. If you are reusing your old ones, make sure they are clean. You can attach them to the wall using a brad nailer for a secure fit. The bottom of the baseboard should sit just above the new floor, completely hiding the gap along the wall. If the baseboard does not cover the gap, you can add a small piece of molding called a quarter round. You nail this piece directly to the baseboard, not the floor.
Next, you will install transition strips. These are necessary wherever your new flooring meets another surface, like in a doorway. You must choose the right type for each spot.
- T-Molding: You use this to connect two floors that are the same height.
- Reducer: This piece creates a smooth ramp between two floors of different heights.
- End Cap: You use this to finish the edge of your flooring against carpet, a sliding door, or a fireplace.
- Stair Nose: This creates a safe and finished edge for any steps or landings.
Pro Tip: 💡 Many flooring brands, like Mohawk and Pergo, offer multi-function transition strips. You can cut a single 4-in-1 or 5-in-1 piece to work as a T-molding, reducer, or end cap. This makes finding a perfect match for your floor much easier.
Carefully measure and cut each transition piece. Most systems are designed to snap into a metal track that you screw to the subfloor. Following the manufacturer’s instructions ensures a secure and lasting finish for your beautiful new floor.
Common DIY Mistakes and How to Avoid Them
Even the easiest flooring projects can go wrong if you make a few common mistakes. You can avoid major headaches by learning what to watch out for. A little extra care ensures your new floor looks professional and lasts for years.
Ignoring Subfloor Imperfections
You should never lay new flooring over a damaged subfloor. A flat, stable base is essential for a successful installation. Ignoring problems with your subfloor will cause your new floor to fail. You should look for warning signs that indicate your subfloor needs repair before you begin.
Some issues are serious and may require a professional. You should watch for:
- Bouncy or Soft Spots: Areas that feel springy underfoot suggest the subfloor is weak.
- Visible Water Damage: Stains, mold, or musty odors are clear signs of moisture problems.
- Sagging or Uneven Floors: Dips in the floor point to structural issues or moisture damage.
- Persistent Squeaking: Loud, constant creaking can mean the subflooring is loose.
- Bubbling or Cupping: Bubbles in old vinyl or cupping in wood floors often signal moisture coming from below.
Fixing these problems first is the only way to guarantee a beautiful, long-lasting result.
Forgetting to Leave an Expansion Gap
You must leave a small space between your new flooring and the walls. This is called an expansion gap. Materials like LVP and laminate naturally expand and contract with changes in temperature and humidity. Without this gap, the planks will push against the walls, causing them to buckle or warp.
Important: Always follow the manufacturer’s instructions for the correct gap size. For most LVP and laminate floors, this is typically between 1/4 inch and 3/8 inch.
This small gap will be completely hidden once you reinstall your baseboards. Forgetting this step can void your warranty and ruin your hard work.
Not Staggering Your Planks Correctly
You need to stagger the seams of your planks to create a strong and visually appealing floor. If the short ends of the planks line up, you create weak points called “H-joints.” This looks unnatural and can cause the planks to separate over time.
The goal is a random pattern. A good rule is to make sure the end joints in adjacent rows are at least six inches apart.
- Start your first row with a full plank.
- You can often use the piece you cut from the end of the first row to start your second row.
- Continue this process, making sure no two seams are too close together.
Avoid creating a noticeable “step” pattern. A random layout gives you the most professional and durable finish.
Starting Without a Clear Game Plan
You should never begin a flooring project without a solid game plan. Diving in without preparation is a recipe for frustration and costly errors. A clear plan turns a big job into a series of small, manageable steps. It helps you anticipate challenges and ensures you have everything you need before you start. Your game plan is your roadmap to a successful installation. 🗺️
A complete plan covers more than just laying down planks. You need to think through the entire project from start to finish. A successful plan includes several key stages.
- Select the Right Flooring. You should research your options and bring home samples. This helps you see how the material looks in your home’s light.
- Assess the Job Site. You must measure your space accurately. Remember to add about 10% extra for cuts and mistakes. You also need to identify your subfloor type and check for any potential issues.
- Plan for Floor Removal. You need a strategy for removing the old flooring. This is also the time to address any subfloor problems you found, like uneven spots or moisture damage.
- Consider the Details. You should think about how your new floor will meet other surfaces. Plan for transitions in doorways and around appliances. You also need a plan for moving furniture out of the room.
- Create a Full Budget. Your budget should include more than just the flooring. You must account for the cost of tools, underlayment, floor prep materials, and old floor disposal.
Pro Tip: 💡 Write down your plan. A detailed list of materials and steps keeps you organized. It helps you track your progress and prevents you from forgetting a critical task. This simple document is your best tool for a stress-free project.
You now have the knowledge to tackle your flooring project. For 2026, your best choices for a DIY-friendly upgrade are Luxury Vinyl Plank and Laminate. They offer a great mix of style, strength, and simple installation. You can achieve a beautiful new floor by choosing the right material, preparing your room, and following the correct steps.
A successful DIY project is a rewarding investment. You will feel proud of your new floor for many years. 🏡
FAQ
What is the easiest flooring to install for a beginner?
Peel-and-stick vinyl tiles are the simplest option for a true beginner. You just remove the backing and press the tiles onto a clean subfloor. For a more durable choice, Luxury Vinyl Plank (LVP) with a click-lock system is also very user-friendly and a great starting point.
Can I install new flooring over my old floor?
You can often install new flooring over an existing hard surface. The old floor must be clean, flat, and in good condition. You should not install new flooring over soft surfaces like carpet. Always check the new flooring manufacturer’s guidelines for specific instructions.
How long does a DIY flooring project usually take?
A DIY flooring project can be a weekend job. A small room might take one day. A larger space could take two to three days. Your timeline depends on the room size, your skill level, and the amount of prep work your subfloor needs.
Do I need underlayment for LVP or laminate?
Many modern LVP and laminate products come with a pre-attached underlayment. This saves you a step. If your flooring does not have it, you will need to install a separate underlayment. It helps with sound reduction and provides a moisture barrier.




