
When you want to transform your bathroom, lvt in bathroom settings stands out as a smart choice. You experience durability against daily wear, even when water splashes onto the floor. Most homeowners select lvt in bathroom spaces for these reasons:
- Lvt resists water and humidity, making it ideal for wet areas.
- Installation proves easy to install, even for beginners.
- The surface mimics wood or stone, offering authentic designs.
- You can install lvt over many subfloors.
- Simple cleaning keeps your bathroom fresh.
You enjoy a floor that handles water, stands up to heavy use, and looks great.
What Is Luxury Vinyl Tile (LVT) Flooring?
Understanding LVT Flooring
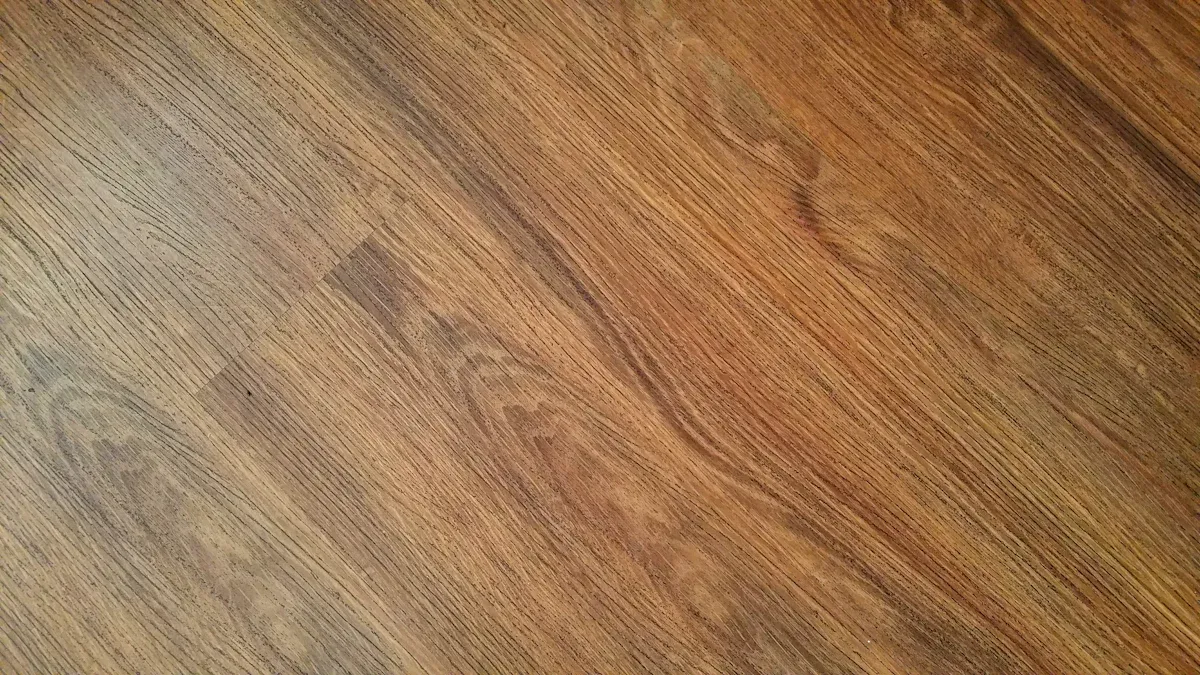
Luxury vinyl tile, often called LVT flooring, is a modern solution for your bathroom. You get a product made from several layers. The top layer is a clear wear coat made of PVC and urethane. This layer protects against scratches, stains, and water. Underneath, a print film layer uses advanced printing to create realistic wood or stone looks. The core is a strong blend of PVC resins, calcium carbonate, and stabilizers. The bottom layer adds stability and keeps water from seeping through. Manufacturers use heat and pressure to bond these layers, making luxury vinyl tiles tough and waterproof. Some LVT flooring uses a rigid core, like SPC or WPC, for extra strength and easy installation. You can trust this construction to handle daily water exposure in your bathroom.
LVT vs. Other Bathroom Flooring Options
When you compare LVT flooring to other choices, you see clear differences. Traditional ceramic tile is hard and stable but can crack if something heavy drops on it. LVT is flexible and absorbs impact, so it resists cracking. Laminate flooring is less waterproof and can swell if water gets in. LVT in bathroom spaces stays strong even with standing water. You also find LVT easier to install than ceramic or porcelain tile. Many LVT products use click-lock joints, so you can install them yourself. Maintenance is simple because you do not need to clean grout or wax the surface. The table below shows how LVT compares to other popular bathroom flooring:
| Flooring Type | Waterproof | Comfort | Installation | Maintenance | Cost per sq ft |
|---|---|---|---|---|---|
| Luxury Vinyl Tile | Yes | Soft | Easy | Simple | $1.50-$12.00 |
| Ceramic Tile | Yes* | Hard | Complex | Moderate | $1.00-$15.00 |
| Porcelain Tile | Yes* | Hard | Complex | Moderate | $10-$20.00 |
| Laminate | Partial | Medium | Easy | Simple | $2.00-$8.00 |
*Ceramic and porcelain tiles are water-resistant, but grout lines can let water through if not sealed.
Why LVT in Bathroom Settings Stands Out
You want flooring for bathrooms that can handle water, look great, and feel comfortable. Luxury vinyl tiles offer all these benefits. The waterproof core keeps water from damaging your floor. The wear layer protects against scratches and fading. You can choose from many designs, including wood and stone looks, to match your style. LVT flooring is also slip-resistant, which helps keep your bathroom safe. You can use it with underfloor heating for extra comfort. Installation options include glue-down and click-lock, so you can pick what works best for your space. With luxury vinyl plank and tile, you get a durable, stylish, and practical choice for any bathroom.
Key Benefits of LVT in Bathroom Renovations
Waterproof Performance and Moisture Resistance
When you choose LVT in bathroom renovations, you get a floor that stands up to water every day. The multi-layered design of LVT includes a waterproof core. This core keeps water from soaking into the floor, so you do not have to worry about spills or splashes. Water resistance is one of the most important benefits of LVT. You can mop up water quickly, and the floor will not swell or warp.
Let’s compare moisture resistance among popular bathroom flooring options:
| Flooring Type | Moisture Absorption Rate | Water Resistance | Suitability for Bathrooms |
|---|---|---|---|
| LVT | <0.1% | Excellent | Highly suitable |
| LVP | 0% (100% waterproof) | Superior | Top choice |
| Sheet Vinyl | <0.1% | Excellent | Highly suitable |
| Porcelain Tile | Near 0% | Superior | Top choice |
| Natural Stone | Near 0% | Superior | Top choice |
| Engineered Hardwood | Moderate | Moderate | Somewhat suitable |
| Laminate | High | Poor | Not recommended |
Note: LVT and LVP both offer strong water resistance, but LVP is fully waterproof. LVT remains a budget-friendly and reliable option for most bathrooms.
You can trust LVT to handle daily water exposure. The water resistance of LVT means you do not need to worry about mold or mildew under normal use. This makes LVT in bathroom spaces a smart and safe choice.
Longevity and Durability in Wet Environments
You want your bathroom floor to last for years. LVT delivers longevity and durability, even in wet and busy spaces. The importance of the wear layer cannot be overstated. This top layer protects against scratches, stains, and daily wear. You get a floor that resists dents and scuffs, even if you drop something heavy.
LVT stands out as durable flooring because it combines a tough surface with a flexible core. The glue-down installation method creates a tight seal, which adds extra water resistance. This method helps prevent water from getting under the tiles. You can expect LVT to last 10 to 20 years with proper care. Regular cleaning and quick spill removal help maintain its longevity.
Compared to ceramic tile, LVT offers easier maintenance and more comfort. Ceramic tile can crack or chip, but LVT absorbs impact and resists wear. The importance of the wear layer means your floor keeps looking new, even in high-traffic bathrooms. You get the benefits of LVT without the hassle of grout or sealing.
Design Versatility and Comfort
LVT gives you unmatched versatility in bathroom design. You can pick from a wide range of styles, colors, and finishes. LVT mimics natural materials like wood, stone, and ceramic. You can create a modern, rustic, or classic look without the high cost or upkeep of real stone or wood.
- LVT offers realistic textures and patterns, such as marble, oak, or slate.
- You can choose from neutral tones or bold patterns to match your taste.
- The variety of shapes and sizes lets you customize your bathroom floor.
- LVT provides warmth and softness underfoot, making it more comfortable than ceramic tile or stone.
- The waterproof core and grout-less options add to its practicality.
You will notice that LVT feels softer and quieter than hard tile. This comfort makes a big difference when you stand for long periods. The versatility of LVT means you can match any bathroom style, from sleek and modern to cozy and traditional. You get a beautiful, functional floor that stands up to water and wear.
Tip: Use LVT with underfloor heating for extra comfort and warmth in your bathroom.
The benefits of LVT include water resistance, durability, and design versatility. You get a floor that looks great, feels comfortable, and lasts for years.
Compatibility with Underfloor Heating
You may want your bathroom floor to feel warm and comfortable, especially during cold mornings. Underfloor heating systems can help you achieve this cozy feeling. Many homeowners ask if lvt works well with these systems. The answer is yes—lvt is compatible with underfloor heating when you follow the right steps.
How LVT Performs with Underfloor Heating
LVT handles radiant heat safely. It tolerates temperatures up to 27°C (about 81°F). This temperature keeps your floor warm without causing damage. You should always check the manufacturer’s instructions for your specific lvt product. Some types may have special requirements.
LVT does not transfer heat as quickly as stone or ceramic tile, but it still provides effective warmth. The waterproof nature of lvt makes it a smart choice for bathrooms with underfloor heating. You get a floor that feels soft underfoot and stays dry, even in wet spaces.
Installation Guidelines for LVT and Underfloor Heating
To get the best results, you need to follow some important steps:
- Prepare the subfloor by cleaning and leveling it. Insulate beneath the heating system to improve energy efficiency.
- Test the underfloor heating system before installing lvt. This step helps you avoid problems later.
- Let your lvt acclimate to the room temperature for at least 48 hours before installation.
- Choose lvt with a thickness between 4 and 6 millimeters. Click-lock installation works well because it allows the floor to expand and contract.
- Leave small gaps around the edges of the room. These gaps let the flooring move as temperatures change.
- After installation, increase the temperature of the heating system slowly. This prevents sudden changes that could damage the floor.
Tip: Always confirm the compatibility of your lvt with underfloor heating by reading the manufacturer’s guidelines.
Comparing Heat Transfer of LVT and Other Flooring
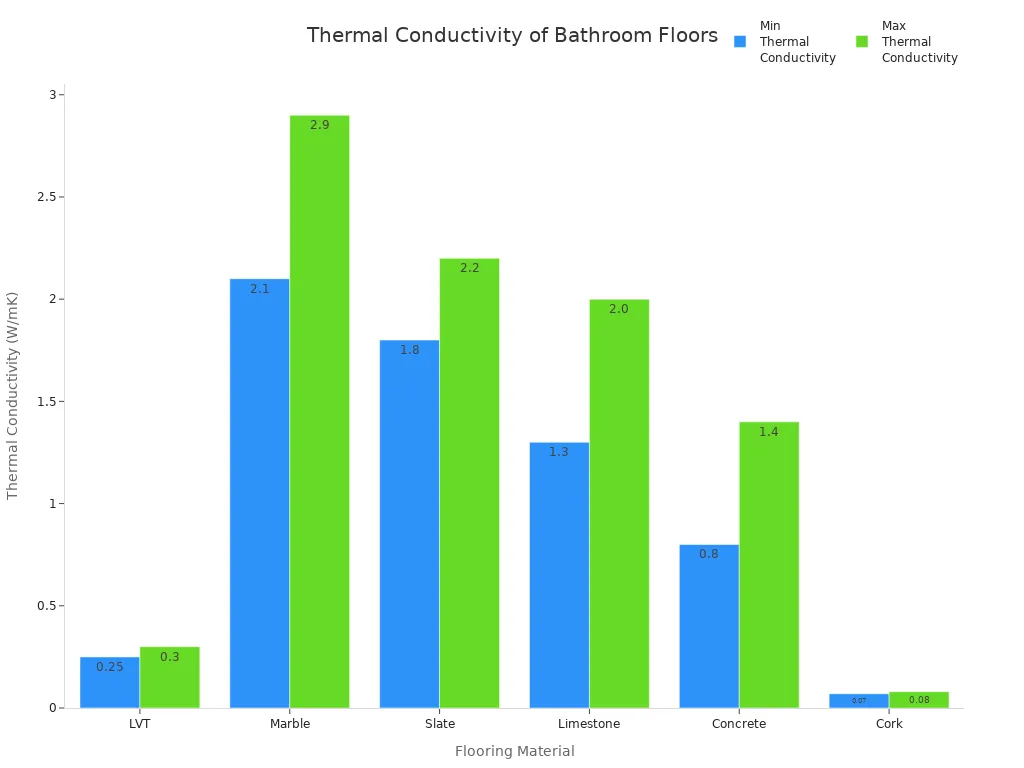
You might wonder how well lvt transfers heat compared to other bathroom flooring. The table below shows the thermal conductivity of common materials used with underfloor heating:
| Flooring Material | Thermal Conductivity (W/mK) | Notes on Use with Underfloor Heating |
|---|---|---|
| Luxury Vinyl Tile (LVT) | 0.25 – 0.3 | Lower conductivity than tile/stone but effective; waterproof; max temp ~80-85°F |
| Marble | 2.1 – 2.9 | Highest conductivity; excellent heat retention and transfer |
| Slate | 1.8 – 2.2 | High conductivity; good heat retention |
| Limestone | 1.3 – 2.0 | Good conductivity; stable temperature maintenance |
| Ceramic/Porcelain Tile | Higher than LVT by ~30% | Premier choice for radiant heat; fast heating and even distribution |
| Concrete | 0.8 – 1.4 | High thermal mass and conductivity; efficient heat transfer |
| Cork | 0.07 – 0.08 | Lower conductivity; compatible but less efficient |
You can see that lvt has lower thermal conductivity than stone or ceramic tile. This means it may take a little longer to warm up. However, lvt still works well with underfloor heating and keeps your bathroom comfortable.
Safety and Comfort Tips
- Always keep the surface temperature of your lvt floor below 27°C (about 80°F).
- Use a sensor to monitor the floor temperature and prevent overheating.
- Test the heating system before and after installing the flooring.
- Gradually increase the heat when you first use the system.
You can enjoy a warm, waterproof, and stylish bathroom floor when you combine lvt with underfloor heating. This combination gives you comfort and peace of mind all year round.
LVT Flooring Installation in Bathrooms
DIY-Friendly Installation Methods
You can install lvt flooring in your bathroom using two main methods: glue-down and click-lock. Both options make installation simple for homeowners. Glue-down installation gives you a stable and durable floor. This method works well in high-traffic areas and lets you replace single planks if needed. Click-lock installation allows you to lay lvt flooring as a floating floor. You can remove and reinstall it easily during future remodeling. Both installation options for lvt flooring require a clean, dry subfloor and time for the material to adjust to room temperature. If you want a project you can handle yourself, click-lock is often the best choice. Glue-down may need more skill, but it offers long-term strength.
- Glue-down: Best for stability and easy repairs.
- Click-lock: Great for flexibility and future changes.
- Both methods need careful subfloor preparation and acclimation.
Tip: Always read the manufacturer’s instructions before starting any installation.
Flexibility for Different Bathroom Layouts
Lvt flooring adapts to many bathroom shapes and sizes. You can use creative patterns to make small spaces look bigger or add style to irregular rooms. For example, laying planks parallel to the longest wall can make a small bathroom feel larger. Diagonal or herringbone patterns help balance rooms with odd angles. Mosaic and smaller tiles add detail without crowding the space. You can even try hexagon or penny round tiles for a unique look.
| Room Layout Type | LVT Installation Strategy |
|---|---|
| Small Rooms | Lay planks parallel to the longest wall to expand the space visually. |
| Narrow Spaces | Lay planks along the length to create a sense of spaciousness. |
| Angled Walls | Use diagonal or herringbone patterns to balance shapes and distract from odd angles. |
| Pattern Choices | Try horizontal for a wider feel, vertical for depth, diagonal for movement, or herringbone for elegance. |
Lay sample planks in different directions to see which pattern fits your bathroom best.
Professional Tips for Proper Installation
You want your lvt flooring to last and stay waterproof. Professionals follow important steps to ensure a successful installation. First, prepare the subfloor by smoothing and drying it. Store your lvt flat in the room for at least 48 hours before installation. Plan your layout by dry-laying tiles and starting from the center. Use the right adhesive and press tiles from the center outward to remove air bubbles. Roll the floor with both hand and heavy rollers for strong contact. Clean any adhesive right away. Seal the edges around walls, toilets, and tubs with silicone to stop water from getting underneath. Protect the new floor from traffic for at least 24 hours. Keep the room at a steady temperature and turn off underfloor heating before and after installation.
- Prepare and test the subfloor for moisture.
- Acclimate lvt flooring for 48 hours.
- Plan your pattern and start from the center.
- Use proper adhesive and rolling techniques.
- Seal all edges with silicone.
- Avoid walking on the floor for a day after installation.
Following these steps helps your lvt flooring stay beautiful and strong for years.
Maintenance Benefits of LVT in Bathroom Spaces
Simple Cleaning and Everyday Care
You will find that lvt flooring makes daily cleaning easy. You do not need special products or complicated routines. Most days, you can keep your floor looking great with simple steps.
- Sweep or dust mop the floor every day to remove dirt and debris.
- Damp mop with a mild, neutral cleaner once a week. Neutral peroxide-based cleaners work well and are safe for lvt.
- For smooth surfaces, use a rotary disk scrubber with a light pad. For textured lvt, use a light-duty brush to reach into grooves.
- Place mats at entrances to trap dirt and moisture before it reaches your bathroom floor.
- Clean up spills right away to prevent stains and reduce slip hazards.
Tip: Avoid solvent-based sealers and acrylic finishes. These can damage the protective layer and void your warranty.
Lvt flooring stands out as low maintenance flooring. You do not need to wax, polish, or seal it like you would with tile or stone. Regular cleaning practices keep your bathroom fresh and safe.
Preventing and Handling Stains or Spills
Stains and spills can happen in any bathroom. Lvt resists most stains, but quick action helps keep your floor looking new. Common causes include food, drinks, hair dye, ink, and even crayon marks.
- Sweep at least once a week to stop dirt from building up.
- Vacuum every two weeks with a soft-brush vacuum.
- Mop with a manufacturer-approved cleaner, but avoid soaps and detergents.
- Wipe up spills as soon as they happen.
If you find a sticky spot, use a plastic knife to gently remove it. For tough stains like ink or dye, use a nylon pad with a heavy-duty cleaner. If needed, a small amount of mineral spirits or nail polish remover can help, but use these with care. Always test in a hidden spot first.
Note: Avoid rubber-backed mats, as they can stain lvt flooring. Use doormats at all entrances for extra protection.
Long-Term Upkeep for Lasting Beauty
You want your lvt to look beautiful for years. Long-term maintenance requirements are simple but important.
- Sweep or vacuum often with soft tools to prevent scratches.
- Damp mop weekly with a pH-neutral cleaner.
- Clean up water and spills right away to avoid damage.
- Do not use harsh chemicals, abrasive pads, or steam mops.
- Place furniture pads under chair and table legs.
- Use mats near sinks and tubs, but avoid rubber backs.
- Fix plumbing leaks quickly to protect your floor and subfloor.
Lvt flooring needs less maintenance than ceramic tile or natural stone. You do not have to worry about grout lines or sealing. This makes lvt a smart choice for busy bathrooms. By following these care tips for maintaining lvt flooring, you keep your floor looking new and performing well.
Care tips for maintaining lvt flooring: Stick to regular cleaning, avoid harsh chemicals, and protect high-traffic areas with mats.
Addressing Drawbacks and Maximizing LVT Performance
Common Issues with LVT in Bathroom Environments
You may notice a few challenges when you use LVT in your bathroom. One common issue is water seeping between the seams if the floor is not installed correctly. This can lead to mold or damage under the tiles. Sometimes, heavy objects can cause dents or scratches on the surface. Direct sunlight may also fade the color over time. If you do not clean up spills quickly, stains can form, especially near seams or edges. Poor ventilation in your bathroom can increase humidity, which may affect the floor’s performance.
Tip: Always check for leaks around toilets and tubs to prevent water from getting under your LVT flooring.
Tips to Enhance Longevity and Durability
You can take several steps to make sure your LVT flooring lasts and stays strong in your bathroom. Follow these expert tips to boost both durability and resistance to water:
- Hire a professional for installation. They will prepare the subfloor and test for moisture, which helps prevent future problems.
- Use seam sealants recommended by the manufacturer. These sealants keep water from slipping between planks or tiles.
- Keep your bathroom well-ventilated. Open a window or use a fan to lower humidity and protect your floor.
- Clean up spills right away. Do not let water sit on the seams or edges.
- Choose pH-neutral cleaning products approved for LVT. These cleaners protect the wear layer and help with easy maintenance.
- Place pads under furniture legs to stop scratches and dents. Use curtains or blinds to block direct sunlight and prevent fading.
- Put mats at the bathroom entrance. Mats catch extra moisture and dirt, which helps keep your floor in top shape.
Note: Regular care and quick action after spills will help your LVT flooring look new and last longer.
You can trust LVT to deliver a winning combination of durability, waterproof protection, and easy installation in your bathroom.
- Experts recommend LVT for its slip resistance, comfort, and realistic designs that mimic wood or stone.
- Leading brands offer strong warranties and support, making LVT a reliable choice for wet, high-traffic spaces.
- The cushioned feel and easy maintenance help keep your bathroom safe and beautiful for years.
Many homeowners find that LVT adds comfort and style while helping homes sell faster in today’s market.
FAQ
Can you install LVT over existing tile in a bathroom?
Yes, you can install LVT over most existing tile floors. Make sure the old tile is clean, dry, and level. Fill any deep grout lines first. This helps your new LVT floor stay smooth and last longer.
Is LVT flooring safe for bathrooms with pets?
LVT works well in bathrooms with pets. The surface resists scratches from claws and stands up to accidents. You can clean up spills or messes quickly. LVT also feels comfortable for pets to walk on.
How long does LVT last in a bathroom?
You can expect LVT to last 10 to 20 years in a bathroom. Proper installation and regular cleaning help extend its life. Avoid harsh chemicals and fix leaks quickly. This keeps your floor looking new.
Does LVT flooring feel cold underfoot?
LVT feels warmer than ceramic tile or stone. You can add underfloor heating for extra comfort. Many people find LVT soft and pleasant to walk on, even without extra heat.




