
A new flooring improvement often brings worries about cost and installation. Modern diy flooring solutions offer amazing affordability and ease.
We have many
types of easy-to-install flooring. Popularflooring optionslikevinyl plank flooring, luxuryvinyl, andpeel and stick vinyl tilesareeasy to install. Thesetypes of easy-to-install flooringuse simplevinyltechnology.
The benefits of easy-to-install flooring promise a hassle-free installation. This easy to lay flooring is one of the best diy flooring ideas. These easy flooring solutions empower you to install flooring yourself. This easy flooring improvement simplifies the diy flooring installation. This easy-to-install flooring makes the whole flooring installation simple. Your new flooring installation will be a success.
1. SPC Vinyl Plank: The Durable All-Rounder
SPC (Stone Plastic Composite) vinyl plank flooring is a top choice for any DIY home improvement. This flooring combines a tough, rigid core with the beautiful look of wood or stone. It offers an excellent flooring improvement that you can complete yourself.
Why It’s So Easy to Install
This easy-to-install flooring uses a brilliant click-lock system for a hassle-free installation. You do not need glue or nails. The system creates a “floating floor” that sits over your subfloor. The installation process is very straightforward.
- You interlock the planks at a small angle.
- A gentle tap locks the tongue and groove together, often with a “click” sound.
- This creates a tight seam with no gaps.
- You can easily pull planks apart to fix mistakes.
Best Rooms for SPC Vinyl
SPC vinyl flooring works almost anywhere in your home. Its core makes it 100% waterproof flooring. This feature makes the vinyl flooring perfect for moisture-prone areas like kitchens, bathrooms, and basements. The vinyl material resists spills and humidity without damage.
SPC Vinyl vs. Engineered Hardwood
Wondering how this easy flooring stacks up against traditional options? Here’s a quick comparison.
Feature Engineered Hardwood SPC Vinyl Water Resistance Can be damaged by moisture. 100% waterproof. Scratch Resistance Scratches more easily. Highly scratch-resistant. Dent Resistance Prone to dents from impact. Extremely dent-resistant. Installation Often requires professionals. DIY-friendly click-lock system.
Quick Installation Guide
You can find many online tutorials and how-to guides for this flooring. These detailed instructions make the DIY installation simple. Here are the basic steps for a quick and simple installation.
- Step 1: Prepare your subfloor so it is clean and level.
- Step 2: Lay your first row of vinyl plank flooring along a wall.
- Step 3: Click the next planks into place to complete the row.
- Step 4: Cut the last plank to fit, and use the leftover piece to start the next row.
- Step 5: Continue this pattern across the room for a professional finish.
These simple instructions and guides help you achieve a great result.
2. Luxury Vinyl Tile (LVT): Style and Simplicity
Luxury Vinyl Tile (LVT) offers the perfect blend of high-end looks and practical ease. This flooring gives you the beauty of natural materials like stone or ceramic without the difficult installation or high cost. It is an excellent flooring improvement for any DIY enthusiast. This easy-to-install flooring makes a big impact.
Why It’s a DIY Favorite
You will find the LVT installation process is very manageable, even with basic DIY skills. Experts rate the skill level for this flooring installation as “1 out of 5 Easy,” confirming its beginner-friendly nature. Advanced technology allows this vinyl flooring to look just like glamorous marble. You get an elegant surface without the need for sealing. The comfort of this easy flooring is another major benefit.
LVT feels much different under your feet compared to stone.
- LVT flooring is softer and warmer.
- Natural stone flooring is cold and hard.
- This makes LVT a more comfortable flooring option for standing and walking.
Where LVT Shines
LVT is a fantastic choice for kitchens, bathrooms, and laundry rooms. Its durability and waterproof qualities make it a smart home improvement. This vinyl flooring handles spills and moisture with no problem.
- Durable: The flooring resists dents, heat, and spills.
- Easy to Clean: You can simply sweep, vacuum, or mop the vinyl.
- Comfortable: Its soft, warm feel is great for rooms where you stand a lot.
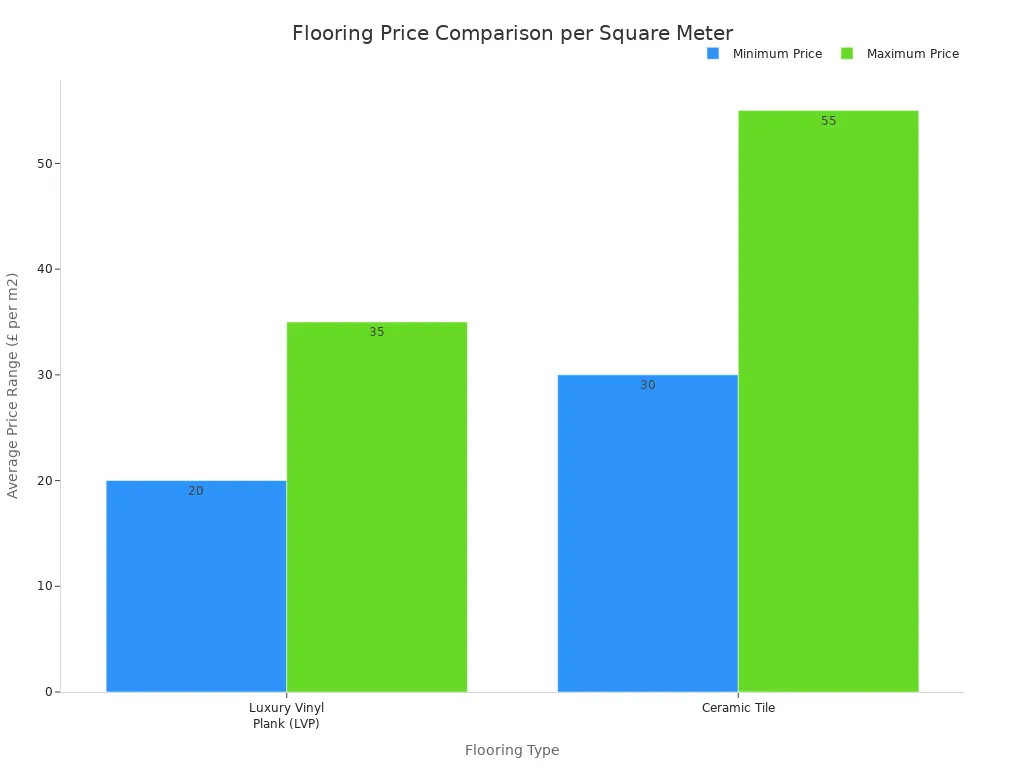
LVT is also more affordable than traditional tile. The cost difference makes your project more budget-friendly.
| Flooring Type | Average Price (per m²) |
|---|---|
| Luxury Vinyl Plank (LVP) | £20 to £35 |
| Ceramic Tile | £30 to £55 |
Quick Installation Guide
You can achieve a hassle-free installation with LVT. Many online tutorials and guides provide detailed instructions for this easy-to-install flooring. The basic installation steps are simple to follow.
- Prepare: Ensure your subfloor is clean, dry, and perfectly level.
- Plan: Lay out a few tiles to decide on your pattern and starting point.
- Install: Depending on your product, either click the tiles together or peel off the backing and press them firmly onto the floor.
- Cut: Use a utility knife to score and snap tiles to fit around edges and obstacles.
These simple instructions help you complete your vinyl plank flooring installation with confidence. Your new vinyl plank flooring will look amazing.
3. Laminate Flooring: The Classic Wood-Look Impostor
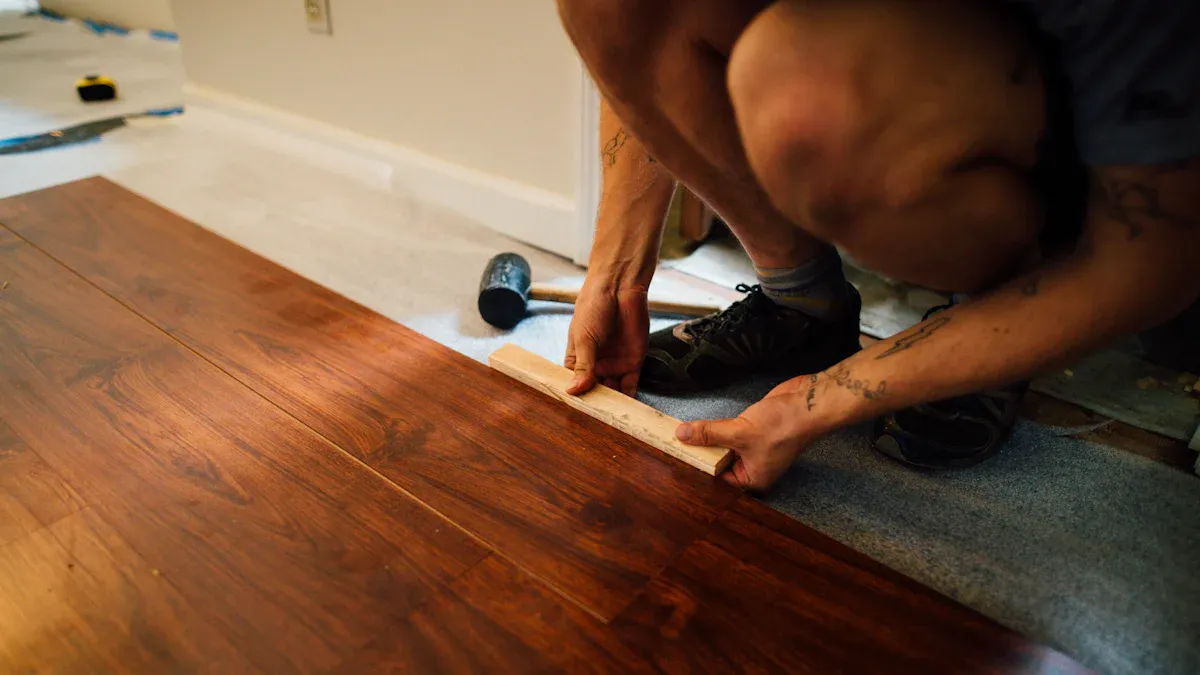
Laminate flooring gives you the beautiful look of hardwood without the high cost or difficult installation. This popular flooring choice is a fantastic home improvement project for any DIY enthusiast. You can achieve a professional-looking result with this easy-to-install flooring.
What Makes Laminate Easy to Lay Flooring
Laminate flooring uses a simple click-lock system. This design creates a “floating floor” that sits on top of your subfloor without glue or nails. This installation method offers several key advantages for your project.
- DIY-Friendly: You can complete the installation quickly without special skills.
- Affordable: The materials and installation are less expensive than traditional methods.
- Easy to Repair: You can replace a single damaged plank instead of the whole floor.
These benefits make laminate an excellent easy to lay flooring option for a weekend improvement.
Best Rooms for Laminate
Laminate flooring is a great choice for living rooms and bedrooms. It resists scratches and fading, so it holds up well to heavy furniture and sunlight. Modern technology has also made this flooring more versatile. New laminate features waterproof cores and advanced locking systems. This improvement means you can now confidently use this flooring in kitchens and bathrooms.
Tip: Check the AC Rating 💡 The Abrasion Class (AC) rating tells you how durable the flooring is. A higher number means more durability.
AC Rating Recommended Use AC1-AC2 Light traffic (e.g., bedrooms) AC3 Heavy residential traffic (e.g., kitchens, hallways) AC4 Light commercial traffic (e.g., small offices)
Quick Installation Guide
You can find many online tutorials and guides with detailed instructions for this easy flooring. A successful DIY installation is within your reach. Following these basic steps will lead to a hassle-free installation.
- Prepare: Make sure your subfloor is clean, flat, and dry.
- Acclimate: Let the flooring sit in the room for 48 hours to adjust to the temperature.
- Install: Lay the first row and click the planks together.
- Stagger: Use the leftover piece from the first row to start the second, creating a natural look.
- Finish: Continue this pattern across the room, cutting planks as needed to fit.
4. Carpet Tiles: The Most Forgiving Flooring
Carpet tiles offer the comfort of carpet with unmatched ease and flexibility. This easy-to-install flooring comes in small squares, making your DIY project much simpler than handling a large roll of carpet. You can create custom patterns or a seamless look with this versatile flooring. This improvement is perfect for a quick room refresh.
Why Carpet Tiles Are So Simple
The modular design of carpet tiles is their biggest advantage. If you spill something or a tile gets damaged, you can simply lift and replace that single square. This makes maintenance a breeze. The installation process is also incredibly straightforward. Many modern carpet tiles are an eco-friendly flooring choice, offering a sustainable improvement for your home.
Eco-Friendly Flooring Facts ♻️ Choosing carpet tiles made from recycled materials offers several benefits:
- It diverts waste like plastic bottles from landfills.
- The manufacturing process uses less energy and water.
- This choice conserves natural resources and reduces CO2 emissions.
Where to Use Carpet Tiles
Carpet tiles are a practical flooring solution for many areas. They are especially useful in rooms that see a lot of activity, like children’s playrooms or home offices. Their unique qualities make them a smart choice for these spaces.
- Comfortable: The flooring is soft and warm, perfect for rooms where you sit or play on the floor.
- Quiet: They absorb sound, which is great for reducing noise in an office or playroom.
- Easy to Clean: You can replace a single tile after a paint or juice spill instead of the entire flooring.
Quick Installation Guide
You can find many online tutorials with detailed instructions for your project. The installation for this easy flooring is very forgiving. A tackifier adhesive is often used for the installation. This adhesive is a milky white liquid that you apply to the subfloor. It turns clear when it is dry and ready for the tile installation. The adhesive stays tacky, like a sticky note, holding tiles in place while allowing for easy removal.
- Prepare: Start with a clean, flat, and dry subfloor.
- Plan: Find the center of your room and draw perpendicular guidelines.
- Apply Adhesive: Roll on the tackifier adhesive and wait for it to turn clear.
- Lay Tiles: Begin placing tiles from the center of the room outward.
- Cut to Fit: Use a utility knife and a straight edge to cut tiles for the room’s perimeter.
This easy-to-install flooring makes the entire DIY installation process simple and stress-free.
5. Peel-and-Stick Tile: The Ultimate in Simplicity
Peel and stick vinyl tiles represent the peak of DIY flooring convenience. This flooring offers a fast and simple improvement for any room. If you want a new look without a major project, this easy-to-install flooring is your answer. The installation is as simple as its name suggests.
Why It’s the Easiest Option
The defining feature of peel and stick vinyl tiles is their straightforward application. Each tile has an adhesive backing. You just peel off the protective paper and press the tile onto your subfloor. This process removes the need for messy glues or special tools, offering incredible ease. This simple installation makes it a top choice for a quick flooring update. While the material cost can sometimes be higher than other options, the DIY potential often makes it more affordable overall.
Cost at a Glance: Peel-and-Stick vs. Pro-Installed Vinyl Your total project cost depends on more than just the material.
Feature Peel-and-Stick Tiles Professionally Installed Sheet Vinyl Material Cost Often more expensive per square meter Generally cheaper upfront Installation You can do the installation yourself, saving money. Requires professional installation, adding to the cost. Overall Cost Balances out with DIY potential. Can be higher due to professional installation.
Best Uses for Peel-and-Stick
Peel and stick vinyl tiles are great for low-moisture areas like laundry rooms, closets, and guest bathrooms. This flooring provides a durable and stylish surface. However, its use is not limited to just the floor. You can get creative with this versatile product for a unique home improvement.
- Art-work: Use faux pressed tin designs to create unique artistic pieces for your walls.
- Cabinet Faces: Update the look of your kitchen or bathroom cabinet doors with a fresh pattern.
- Wainscoting: Apply the tiles to the lower part of a wall for an elegant wainscoting effect.
Quick Installation Guide
You can find many online tutorials with detailed instructions for this easy flooring. A successful DIY project is just a few steps away. Following this guide ensures a hassle-free installation.
- Prepare: Your subfloor must be perfectly clean, smooth, and dry for the best adhesion.
- Plan: Find the center of your room and draw layout lines to guide your flooring installation.
- Install: Start from the center, peeling the backing from one tile at a time and pressing it firmly onto the floor.
- Cut: Use a utility knife to score and snap tiles to fit along walls and around obstacles.
This easy-to-install flooring makes the entire installation process simple.
3 Essential Prep Steps for a Flawless Finish
A successful DIY flooring project starts before you lay the first plank. Proper preparation is the secret to a professional-looking finish. These three steps set you up for a smooth installation and a beautiful, long-lasting floor. Following these detailed instructions is a key part of your home improvement.
1. Prepare Your Subfloor
Your new flooring is only as good as the surface beneath it. You must start with a subfloor that is clean, flat, and dry. Any issues with your subfloor can cause problems for your new flooring later.
Most flooring manufacturers require the floor to be flat within 3/16 of an inch over a 10-foot span. You can check this by laying a long straightedge on the floor and looking for gaps.
For a concrete subfloor, the preparation for your flooring installation involves a few key actions:
- Clean: First, you need to remove all debris and dirt.
- Level: Next, you should fill any low spots or grind down high spots.
- Protect: Finally, you must install a moisture barrier. Concrete can hold moisture, which can damage your new flooring over time.
2. Gather Your Basic Tools
This easy to lay flooring does not require a workshop full of expensive equipment. However, having a few basic tools on hand will make your DIY installation much easier. Many online tutorials and how-to guides show you how to use these items. For most click-lock or peel-and-stick flooring projects, you will need:
- Tape Measure
- Pencil
- Utility Knife (also called a Shark Knife)
- Tapping Block or Plank Hammer
- Pull Bar
- Knee Pads
Gathering these before you begin your flooring installation saves you time and frustration.
3. Acclimate Your New Flooring
You should let your new flooring get used to its new home before the installation. This step is called acclimation. It allows the flooring material to adjust to your room’s temperature and humidity. This simple improvement prevents problems like buckling, warping, or gaps from forming after the installation.
The process is very simple. You just bring the boxes of easy flooring into the room where you will install them.
Acclimation Time ⏳
- LVT & Laminate: Let the flooring acclimate for a minimum of 48 hours.
- Check Instructions: Always read the manufacturer’s specific instructions, as some flooring, like SPC, may not need acclimation.
Skipping this step can ruin an otherwise perfect flooring installation.
You now have the knowledge to complete your own flooring improvement. Modern diy flooring solutions like SPC vinyl offer great affordability. This easy to lay flooring makes a weekend diy project successful. You can confidently begin your installation with this guide to easy-to-install flooring.
To ensure a professional result, avoid these common mistakes:
- Ignoring subfloor preparation.
- Skipping the acclimation step for your new flooring.
- Forgetting to leave an expansion gap around the room’s edge.
Following the simple prep steps for your easy flooring ensures your installation of easy-to-install flooring looks great for years.
FAQ
Which of these flooring options has the lowest cost?
Peel-and-stick tiles often have the lowest upfront material cost. Your final project cost depends on the specific product you choose. These flooring options offer great affordability. Always compare the total cost of different flooring options before you buy.
Can I install these floors over my existing flooring?
Yes, you often can. Most types of easy-to-install flooring can go over old, hard surfaces like vinyl or tile. Your subfloor must be clean and flat. Some types of easy-to-install flooring may require an underlayment for the best results.
What happens if I make a mistake during installation?
One of the benefits of easy-to-install flooring is that mistakes are easy to fix! You can simply unclick a plank or lift a tile to reposition it. This makes easy flooring a stress-free project for beginners.
Where can I find more detailed instructions? 🧐
You can find many online video tutorials for your project. These guides show you how to handle your specific easy to lay flooring. The manufacturer’s instructions also provide key details about installation and cost. Review these flooring options to understand the total cost.




