
You ask, “can i pyt antislip coatings on laminated plank floors?” The answer is yes. After a new laminate flooring installation, you may notice your laminate floor is slick. This slickness creates a safety issue. You can apply a special coating to your laminate. The key is using a product made just for laminate. This protects your laminate floor’s finish and ensures the coating works correctly after you install laminate flooring.
Choosing the Right Anti-Slip Coating
Selecting the right product is the most important step for your laminate floor. A wrong choice can damage the finish of the laminate. A correct choice adds safety and protects your investment. You need a coating that bonds well without harming the floor’s delicate top layer.
Water-Based vs. Solvent-Based Coatings
You will find two main types of coatings. These are water-based and solvent-based. For indoor projects on laminate, you should almost always choose a water-based product.
Pro Tip: Water-based coatings have low odor and minimal Volatile Organic Compounds (VOCs). This makes them safer for your family and better for indoor air quality. Modern formulas offer excellent durability and can resist heavy foot traffic.
Solvent-based coatings are different. They release high levels of VOCs. These chemicals can cause headaches, dizziness, and other health problems. Proper ventilation is critical when using them, but a water-based option avoids this risk.
What to Look for on the Product Label
You must read the product label carefully. Look for products that state they are safe for laminate or sealed surfaces. Two key indicators of safety and performance are certifications and slip-resistance ratings.
- NALFA Certification: The North American Laminate Flooring Association (NALFA) certifies products. A NALFA seal means the product has been tested for performance and safety on laminate.
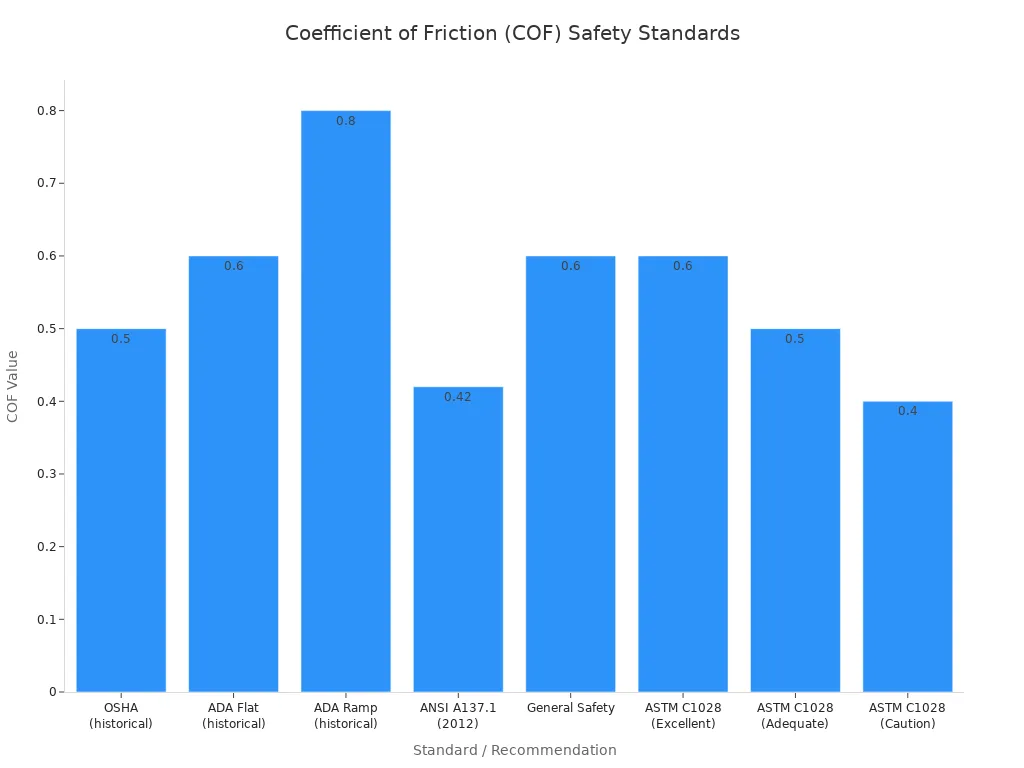
- DCOF Rating: The Dynamic Coefficient of Friction (DCOF) measures slip resistance on wet surfaces. Look for a DCOF rating of 0.42 or higher. This is the industry standard for safe walking surfaces.
Recommended Products for Laminate
Many brands offer anti-slip solutions. Your goal is to find one specifically made for laminate flooring. Some product types you might see include:
- Polish Grip
- Floor Grip
- Dura Grip
Always confirm the product is compatible with laminate before you buy. Some laminate flooring, like certain TrafficMaster lines, already has a textured, slip-resistant surface. This is something to consider before a new laminate flooring installation. Check your floor’s specifications first.
How to Prepare Your Laminate Floor
Proper preparation is the secret to a successful and long-lasting anti-slip finish. You cannot skip these steps. A clean, well-prepared surface ensures the coating bonds correctly to your laminate floor. This preparation is just as important as when you first install laminate flooring.
Step 1: Deep Clean the Surface
You must start with a perfectly clean floor. Any dirt, dust, or cleaning residue will prevent the anti-slip coating from sticking to the laminate. This is a critical step for any diy project.
- Vacuum Thoroughly: First, use a vacuum with a soft brush attachment. You need to remove all loose debris, dust, and pet hair from the surface of the laminate. Pay special attention to the edges and corners.
- Mop with the Right Cleaner: Next, you will mop the floor. Use a pH-neutral cleaner made specifically for laminate flooring. Avoid any products containing wax, oil, or acrylics. These leave a film that blocks adhesion.
- Rinse if Necessary: Some cleaners require a rinse. You can use a separate mop with clean water to remove any leftover cleaning solution from the laminate.
- Dry Completely: Finally, let your laminate floor air dry completely. You can also use a clean, dry microfiber cloth to speed up the process. The surface must be 100% dry before you proceed.
Important Note: A pristine surface is non-negotiable. This single step can determine the success of your diy laminate flooring project. After a new laminate flooring installation, the floor is usually clean, but you should still perform this step to remove any factory residue.
Step 2: Test in an Inconspicuous Area
You should always test the product before applying it to your entire floor. This simple action protects your investment and prevents a costly mistake. A small test confirms the product works well with your specific type of laminate.
Choose a hidden spot for your test. Good options include the floor inside a closet, under a large sofa, or behind an appliance. Apply a small amount of the anti-slip coating according to the product’s directions. Let it dry and cure completely. Once cured, check the test area. You want to see if the finish looks good and if the texture provides the grip you want. This test is a vital quality check before you install laminate flooring coating across the room.
So, can i put antislip coatings on laminated plank floors? A Step-by-Step Guide
You have cleaned and tested your floor. Now you are ready for the main event. This guide will walk you through the application process. Following these steps helps you get a professional-looking finish. You ask, “can i pyt antislip coatings on laminated plank floors with good results?” Yes, and this is how you ensure success when you install laminate flooring coating.
Step 3: Gather Your Tools
Having all your tools ready makes the job go smoothly. You want to avoid stopping mid-application to find something you forgot. This preparation is similar to getting ready for a new laminate flooring installation.
Your toolkit should include:
- The Anti-Slip Coating: Make sure you have enough product to cover your entire floor area.
- Paint Tray: A simple plastic paint tray will hold the coating for easy roller access.
- Applicator: A 3/8-inch nap roller is usually best for applying a thin, even layer on laminate. A small paintbrush is also essential for “cutting in” the edges.
- Painter’s Tape: Use this to protect your baseboards and any transitions to other flooring.
- Protective Gear: Gloves and safety glasses are recommended to protect your skin and eyes.
Step 4: Apply a Thin, Even Coat
This is the most crucial part of your diy project. Your technique determines the final look and effectiveness of the coating. The goal is a thin, uniform layer across the entire laminate surface.
First, use your small paintbrush to apply the coating along the edges of the room. This is a technique professionals call “cutting in.” It ensures you get full coverage right up to the baseboards without making a mess.
Next, pour a small amount of the coating into your paint tray. Lightly load your roller, making sure it is not dripping with excess product. Begin applying the coating to your laminate floor. Work in small, manageable sections, about 3×3 feet at a time. Use long, overlapping strokes to create a seamless finish and avoid visible lines. Applying a thin coat is key; a thick layer can pool, look uneven, and take much longer to dry. This process is a key part of how you install laminate flooring safety features.
Pro Tip: Always maintain a “wet edge.” This means you should overlap your new strokes onto the still-wet edge of the previously coated section. This technique helps you avoid streaks and ensures a uniform appearance across the entire laminate floor.
Many people wonder, “can i pyt antislip coatings on laminated plank floors without it looking bad?” A thin, even application is the secret to a beautiful and effective result for your diy laminate flooring project.
Step 5: Let the Floor Dry and Cure
Patience is essential after you apply the coating. You must understand the difference between drying and curing. A floor can be dry to the touch but not fully cured.
- Drying Time: This is the time it takes for the surface to feel dry. Most water-based coatings are dry enough for light foot traffic (in socks only) in about 6 to 8 hours.
- Curing Time: This is the time it takes for the coating to harden completely and reach maximum durability. Full curing can take anywhere from 24 hours to 5 days, depending on the product, temperature, and humidity.
Check your product’s instructions for specific times. Do not place furniture back on the laminate or allow heavy foot traffic until the floor is fully cured. Rushing this step can ruin your hard work. After the curing period, you can confidently say yes to the question, “can i pyt antislip coatings on laminated plank floors?” and enjoy your safer home. This final step completes the process to install laminate flooring protection.
Maintaining Your Coated Laminate Floor
You have successfully applied the anti-slip coating. Now, you need to maintain it properly. Correct care protects your investment and keeps your laminate floor safe for years. Your cleaning routine will directly impact the coating’s lifespan.
Safe Cleaning Methods
Regular cleaning prevents dirt from scratching the new surface. You should sweep with a soft broom or vacuum with a soft brush attachment often. For a deeper clean every couple of months, you can use a damp mop. Make sure you wring the mop out well so it is not dripping wet.
Pro Tip: For a safe cleaning solution, you can mix a teaspoon of clear, unscented dish soap into a gallon of warm water. This gentle mix cleans effectively without harming the coating on your laminate.
Certain chemicals can strip or damage your new anti-slip coating. You must avoid using them on your floor.
- Vinegar: Using vinegar, even when diluted, can slowly wear away the protective coating and dull your floor’s finish.
- Harsh Cleaners: You should never use products containing bleach, ammonia, or oil. These cleaners will degrade the coating on your laminate and can cause permanent damage.
Always dry your floor with a microfiber cloth after mopping to prevent water spots.
Signs You Need to Reapply
Even the best anti-slip coatings wear down over time, especially in high-traffic areas. You need to watch for signs that it is time to reapply the product. This ensures your laminate floor remains safe.
Look for these key indicators:
- Increased Slipperiness: The most obvious sign is when the floor starts to feel slick again, particularly when wet. This means the grip-enhancing texture is gone.
- Discoloration: You might see faded or yellowed patches. This often happens in areas exposed to sunlight or heavy use and shows the coating is breaking down.
- Cracks and Holes: Any visible damage to the coating means it is no longer protecting your floor effectively.
While professionals use tools to measure the Dynamic Coefficient of Friction (DCOF), you can perform a simple test. If you notice your footing feels less secure, it is likely time to deep clean the surface and apply a fresh coat.
You now have the answer to “can i pyt antislip coatings on laminated plank floors?” This project is a simple way to improve home safety. Your success depends on three key actions.
- Select a product made for laminate.
- Prepare your floor surface with great care.
- Apply the coating in a thin, even layer.
Following these steps gives you a safer floor. You can now enjoy the new grip and the peace of mind that comes with it.
FAQ
Will the coating change my floor’s appearance?
The coating adds a fine texture for safety. Most products create a matte or satin finish. You should always test the product in a small area first. This lets you see the final look before you commit to the entire floor.
How long does an anti-slip coating last?
The coating’s lifespan depends on foot traffic. You can expect it to last 1 to 3 years. You should inspect your floors annually for signs of wear. High-traffic zones may need reapplication sooner than other areas.
Can I use this coating on other types of floors?
Some coatings work on multiple surfaces like vinyl or tile. You must read the product label carefully. Never use a coating on a floor type not listed in the instructions. This simple check prevents accidental damage to other floors.
Is applying the coating a difficult DIY project? 🛠️
No, this is a manageable DIY project for most homeowners. Your success comes from good preparation and a thin application. You just need to follow the product’s directions closely. Patience is the most important tool for this job.




